Welcome to the anorak pack for TraptionBakery, the "Upcyclepunk Postimperial Curio".
To explain a couple of the terms in the opening sentence:-
Upcyclepunk: an aesthetic and mind set born from the desire to reduce waste and the concerted effort to reuse and repurpose items in a functional, attractive and interesting manner.
In the Beginning.
In the early days of the project a few people asked me, with a somewhat concerned expression, if I had the game all planned-out.
I assured them I had... this wasn't a total lie... OK, so I had no plan but the plan was that there was no plan.
I wanted the scene to be made-up of objects placed as if they were all bodged-in ad-hoc, and one way to ensure that all the objects looked like they were all bodged-in ad-hoc was
for all the objects to actually be bodged-in ad-hoc.
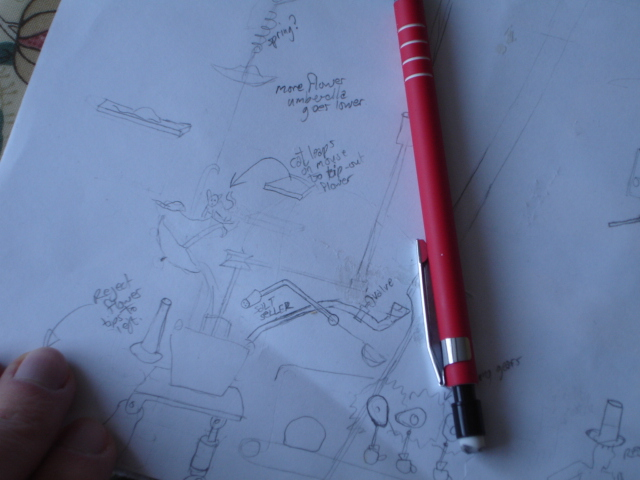
The only thing I did was a couple of scrappy little sketches (below) to sort-of prove that it, might, all be possible.
All I knew for certain was that grain had to come in somewhere and a fully baked loaf of bread had to come-out somewhere else.
I had thought that I'd include somewhere to actually grow the wheat, and thresh it too, but I quickly ruled that out when I began to realise how mammoth the project was even without that.
So I started with a big square factory, then I imagined it was set into a hill (like some buildings locally seem to be at Trinity Hill)
so that I could also have the option of things coming in at the top as well as to the left and right.
An example of how deliberately poor planning helped force things to be agreeably strange:
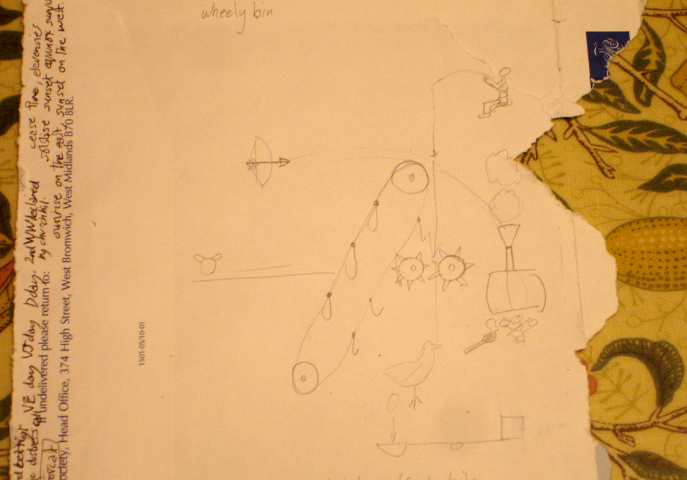
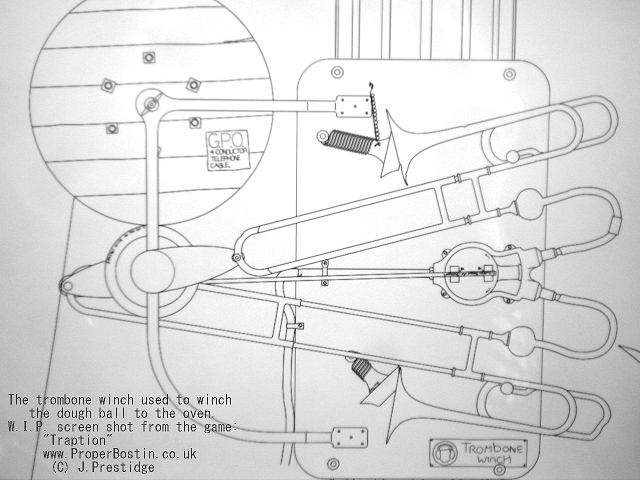
I tried to fit the bread baking oven on the ground floor but I just could not fit it in and had to give-up and put it on a specially created mezzanine level,
and because of that I had to create some way of getting the dough ball up to the oven and so the trombone winch (pictured below) was dreamed into existence.
So What's all the "Postimperial" Nonsense in the Strap Line?
If it's British and it's contemporary then it's postimperial so am I making something out of nothing?
It wasn't a theme I intended specifically, I just intended the game to have a British feel to it.
But I think as soon as I put in the Headless Helter Skelter
the postimperial theme started to take shape... it echoes ( in a artist's contrived hidden meaning type of a way )
postimperial Britain in that its progress seems a bit headless:
you climb-up to the top but then it's a quick downwards spiral before you have to climb up again, representing the rise and fall of Britain's postimperial progress...
admittedly not a very good analogy in one way because the downward slide of the helter skelter is the enjoyable part, although the downward bit in British progress is so inevitable
I think maybe it does give us a perverse pleasure after all this time.
Here follows a few examples of what I mean (4 of which have their visual remains contained in the TraptionBakery artwork).
Deciding on a Style For the Game Graphics.
As for the style of the graphics for TraptionBakery I first considered pencil drawings because, for some time, I had wanted to have a game with a natural hand dawn kind of look to it.
But I also wanted the game to be very intricate so that you'd have to zoom-in to fully see the all the detail
.... and that would need really hi res scans of the drawings if they were to still look good when zoomed-in loads.
And hundreds of high res scans would have used a lot of memory and been quite difficult to manage.
Also the pencil drawings, in their own right, would have to look good close-up and I haven't had a lot of drawing practice over the years:
I have the eye for it so I can end-up with a good looking drawing,
but if you were to look closely you would see lots of marks from my countless rubbing-out and redrawing,
so it would not look good for high res scans.
I used to draw a lot, but as soon as computers became available to the common people in the UK in the form of the ZX80 (in 1980 when I was in my earlier teens) I was totally smitten with the art of computer programming and all other arty activities fell by the wayside except what was required for art at school. So you could say that all the artwork you see in my game is 'programmer art' which is usually a derogatory term used by artists about game graphics done by the game programmer themself: implying that programmers should stick to what they know -- sometimes that misses the point though because even if the programmer knows he/she can't draw very well, if it's a solo project they've put their heart and sole into it using their own time and expense, it makes the project personal: "100% them".
So... anyway... I decided to use the style of pen and ink drawing which used to be my favourite way of drawing cartoons (in the pre computer days), where I would do the drawing in pencil and then draw-over it with a precise ink pen (an isograph) and then rub-out all the pencil lines leaving just the ink. This pen'n'ink style held more promise for the game graphics because the black lines were high contrast and could be emulated by drawing simple black lines on the screen with vectors and arcs etc. and because the computer would redraw the lines each time you zoomed-in, rather than displaying scans/photos, the lines would always be sharp no matter how far you zoomed-in. Ideal. Also using this style allowed me to cheat a bit and as you zoom-in I could make the lines get thinner, otherwise when you think about it, the lines would get really thick if you zoomed way in, and be far too gobby for the intricate bits of machinery.
Thinking About Drawing the Artwork.
The creative process I envisaged for this project was vastly different to how things things turned-out.
Even though the project turned-out to be a mammoth one stealing years of my life,
when dreaming-up the project I thought I'd identified some good techniques to make for rapid development.
My friend Matt had told me about the Captain Pugwash animation and how because they animated cut-outs of heads and arms etc in real time with hidden rods or whatever,
rather than using stop frame animation -- making the production of each episode very swift.
That stuck in my mind and I started to think of ways I could speed-up development,
for example I envisaged I could just Google the objects I required and simply trace round them and that would be that:
I would just assign a pivot point or origin and animate it in my game with a smidgen of code (simply by moving or rotating).....
well as it turned out that just wasn't possible,
for starters when you Googled any object like a ships wheel or a wheel barrow etc they were hardly ever photographed at the angle I required
(I would usually want things seen exactly side-on or head-on).
Also Google images is dominated by American images which was a problem for this project because it was to have a particularly British feel to it.
The first couple of pages of image searches are sometimes made-up of American images of what you are searching for,
unless it has a particularly vernacular name (e.g. searching for "fire engine" will get mostly British pictures because the American term is "fire truck").
The other problem was that even if you found a British sytle object photographed at the ideal angle and you traced round it...I found that it just doesn't look right...
a handle on a broom for example would just look far too spindly.
In the end I only managed to trace about five pictures in the way I originally envisaged,
one that springs to mind is the wheel barrow (to the right of the knock back piano).
So although almost everything was drawn rather than traced, everything was nonetheless to scale. I measured chair heights and table heights and so on around the home and calculated scales to make sure the virtual versions in my game were as true to scale as possible. I even had a ruler in the corner of the screen for most of the development one for feet and inches and another for metric so that I could double check things were the size they were supposed to be. I was a bit upset however that I had to cheat a bit on one thing and reduce the size of Concord's nose cone by 2 per cent to fit it in.
There was another aesthetic problem which was not just with photographs but with the way things look in the modern world,
especially since plastics were widely used and designers went to town making things pleasant to hold and in interesting pleasing shapes not necessarily
with anything to do with how they worked.
The extreme example of this is the telephone, once upon a time it had distinct separate parts:
a handset you can lift with one end of it a pod containing a microphone and the other end a pod containing a speaker
(because microphones and ear-piece speakers used to be quite big),
and the base was a reciprocal shape to accommodate the handset and also with an easily recognisable dial or keypad...
you see the function of the thing determined the shape and in turn the shape of a thing would give you a clue as to what it might do as well as making things more easily recognizable.
Now-a-days a phone is basically a rectangle... if you want to represent that in a game, or any other visual art, so that people will recognise it as a phone as opposed
to say a pack of cards or a paperback book
then you need show it in quite a lot of detail, but since I decided to use line drawing style graphics (a la pen'n'ink)
I'd be depicting it as not much more than a basic out line and that would not be easily recognizable.
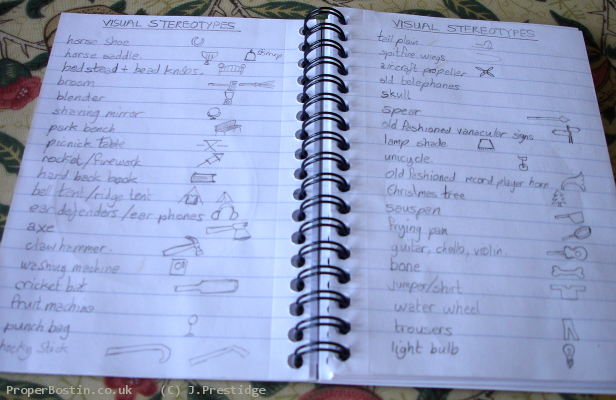
So I started a list of things that could be easily recognizable from just the outline (the photo below shows a couple of pages of it). I added to the list any time I thought of something
so that I'd have a good palette of objects to use in the game.
(Excuse the spelling mistakes in this and other written stuff. They're only personal scribblings.)
How Will I get the Artwork I Draw Into the Game?
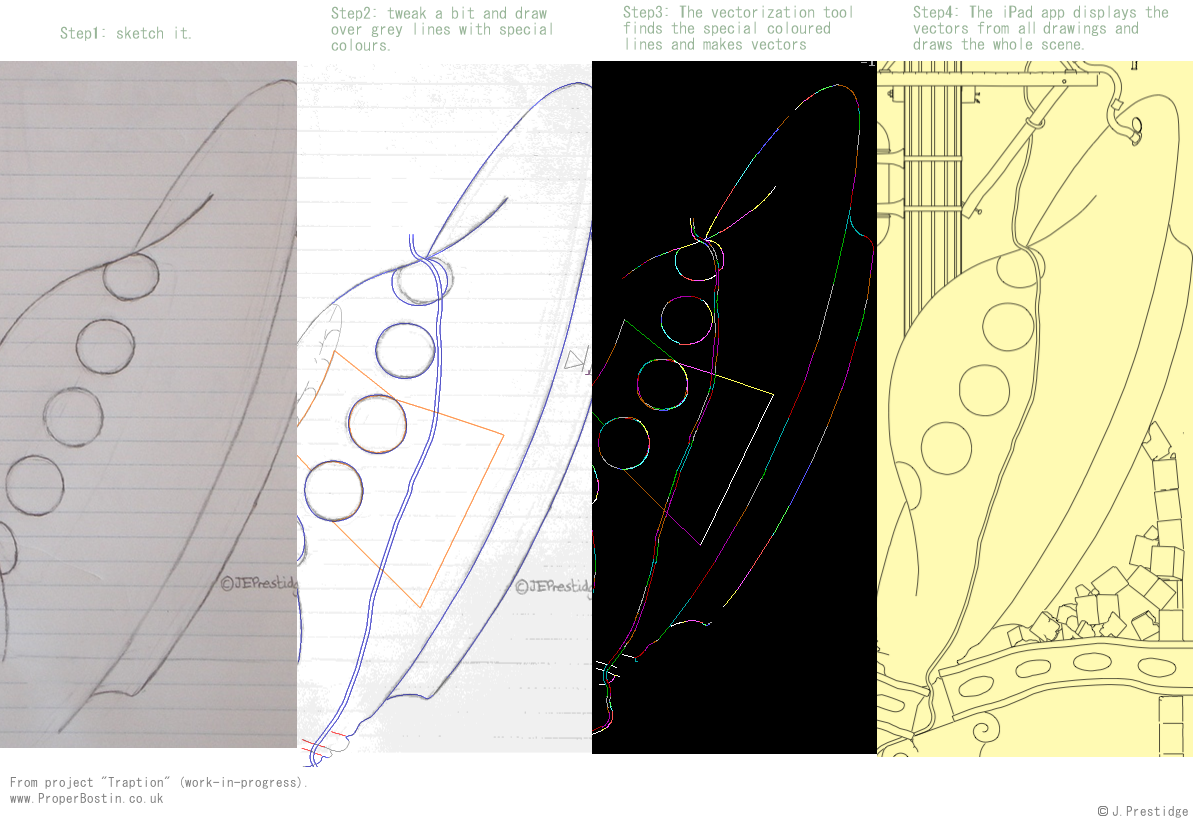
So after deciding that pen'n'ink style was a viable option I needed a system to convert a drawing (either done on paper or in an art package on computer) to vectors and arcs.
I had a look round for existing software to do this but I didn't really find what I wanted, so I set about writing my own vectorization software/tool-chain to do the job.
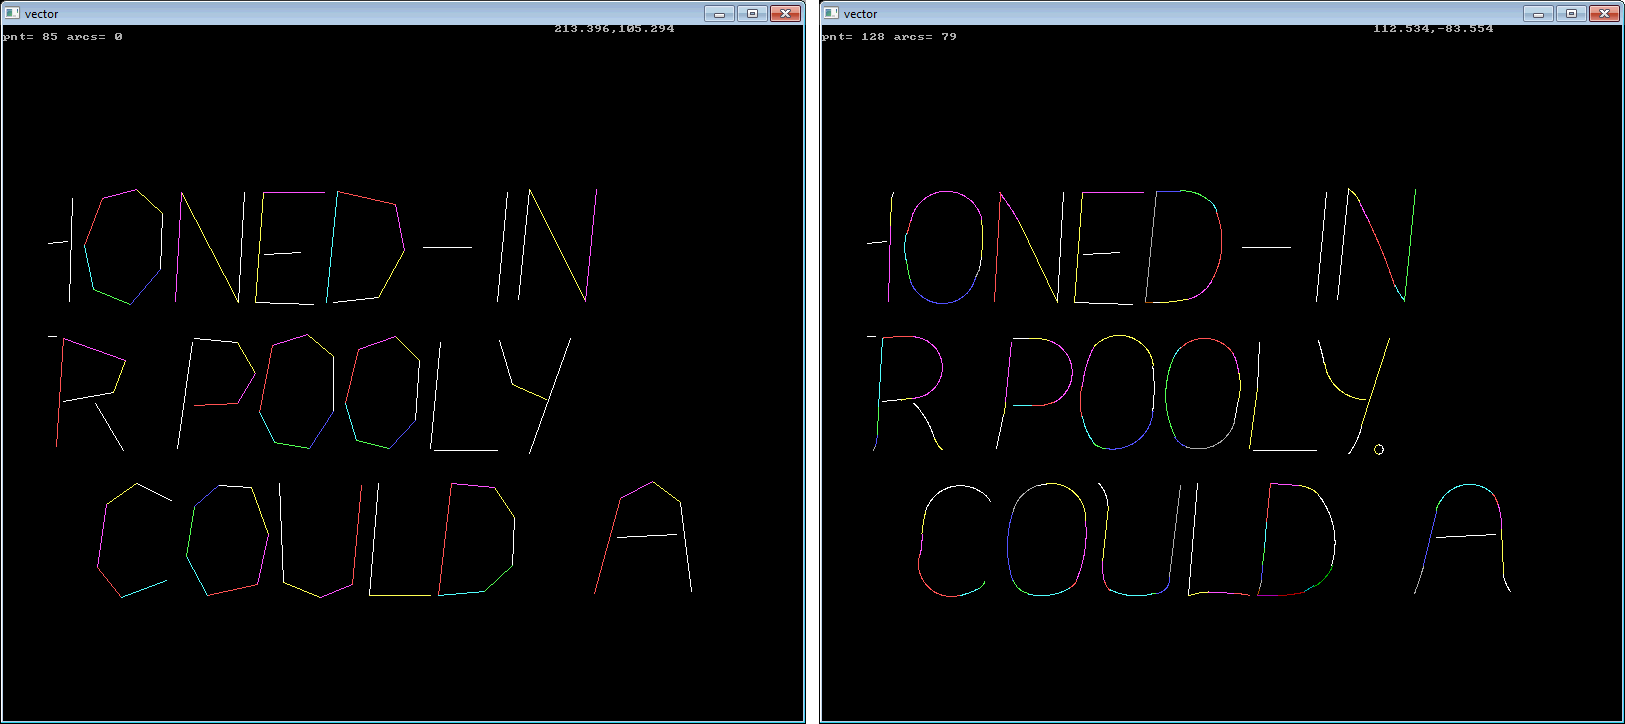
I devised a method so I could do a drawing in pencil and scan it in (Step1 below), and then draw-over the pencil lines in an art package with a lines of a single pixel width (Step2).
The 1 pixel width lines would in be one of a few special colours that my software would detect when processing the image and then fit vectors and arcs onto that line (Step3).
See in step3 where each vector my software has generated is in a different colour just so that you can see where the vectors start and end.
Then my software has to compact and save those vectors and arcs into a vector file,
compositing them together with all the other hundreds of drawings at various scales that make-up the whole scene.
That vector file is then included with the game for it to read and paint the graphics from (Step4).
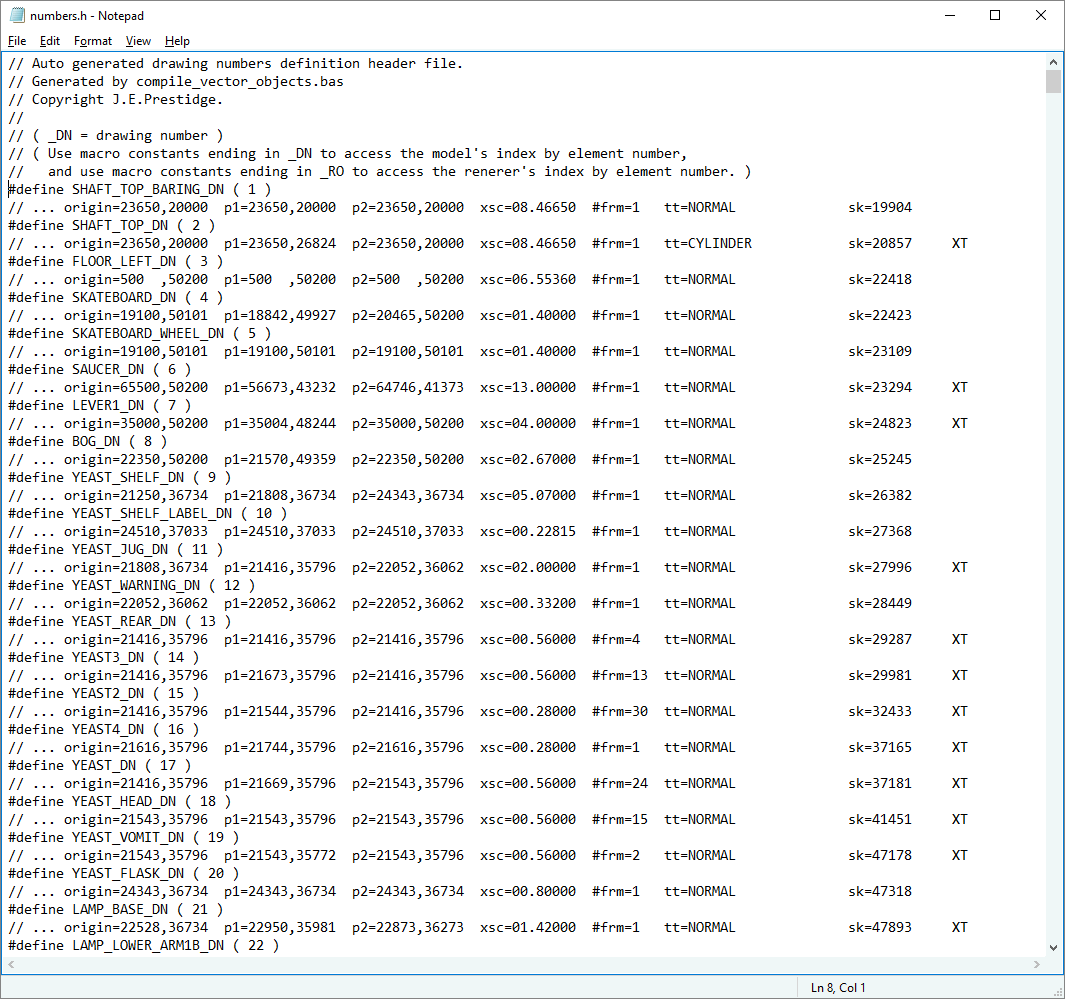
The below picture shows the first part of another file my vectorization software generates, not the vector file itself containing lines and arcs but
it lists just the names and details of the drawings for reference by the game program code.
I've included it just to give you a flavour of how the drawings are split-up within the scene.
("SAUCER_DN" is the name of saucer drawing above with a _DN suffix, and similarly see the other words ending in _DN for other drawing names)
(The number in brackets is the drawing number - the last drawing number is 620 so what you see below is just a small part of this file, and infact there are many more than 620 drawings because some contain a number of animation frames)
("#frm=" this shows the number of frames in an animation, "1" if the drawing is not animated.)
("origin=" shows where the drawing is placed within the scene sized at 65536x65536 units.)
("xcs=" shows the scale each drawing will be drawn at within the scene.)
As well as doing drawing in pencil, the system I devised also allowed me to do drawings on the computer, in an art package, in light grey
(to sort-of emulate pencil lines) and then in the same way I'd draw over those
lines with the one pixel width lines of special colours. So it was quite flexible I could draw on paper or computer as I pleased at the time.
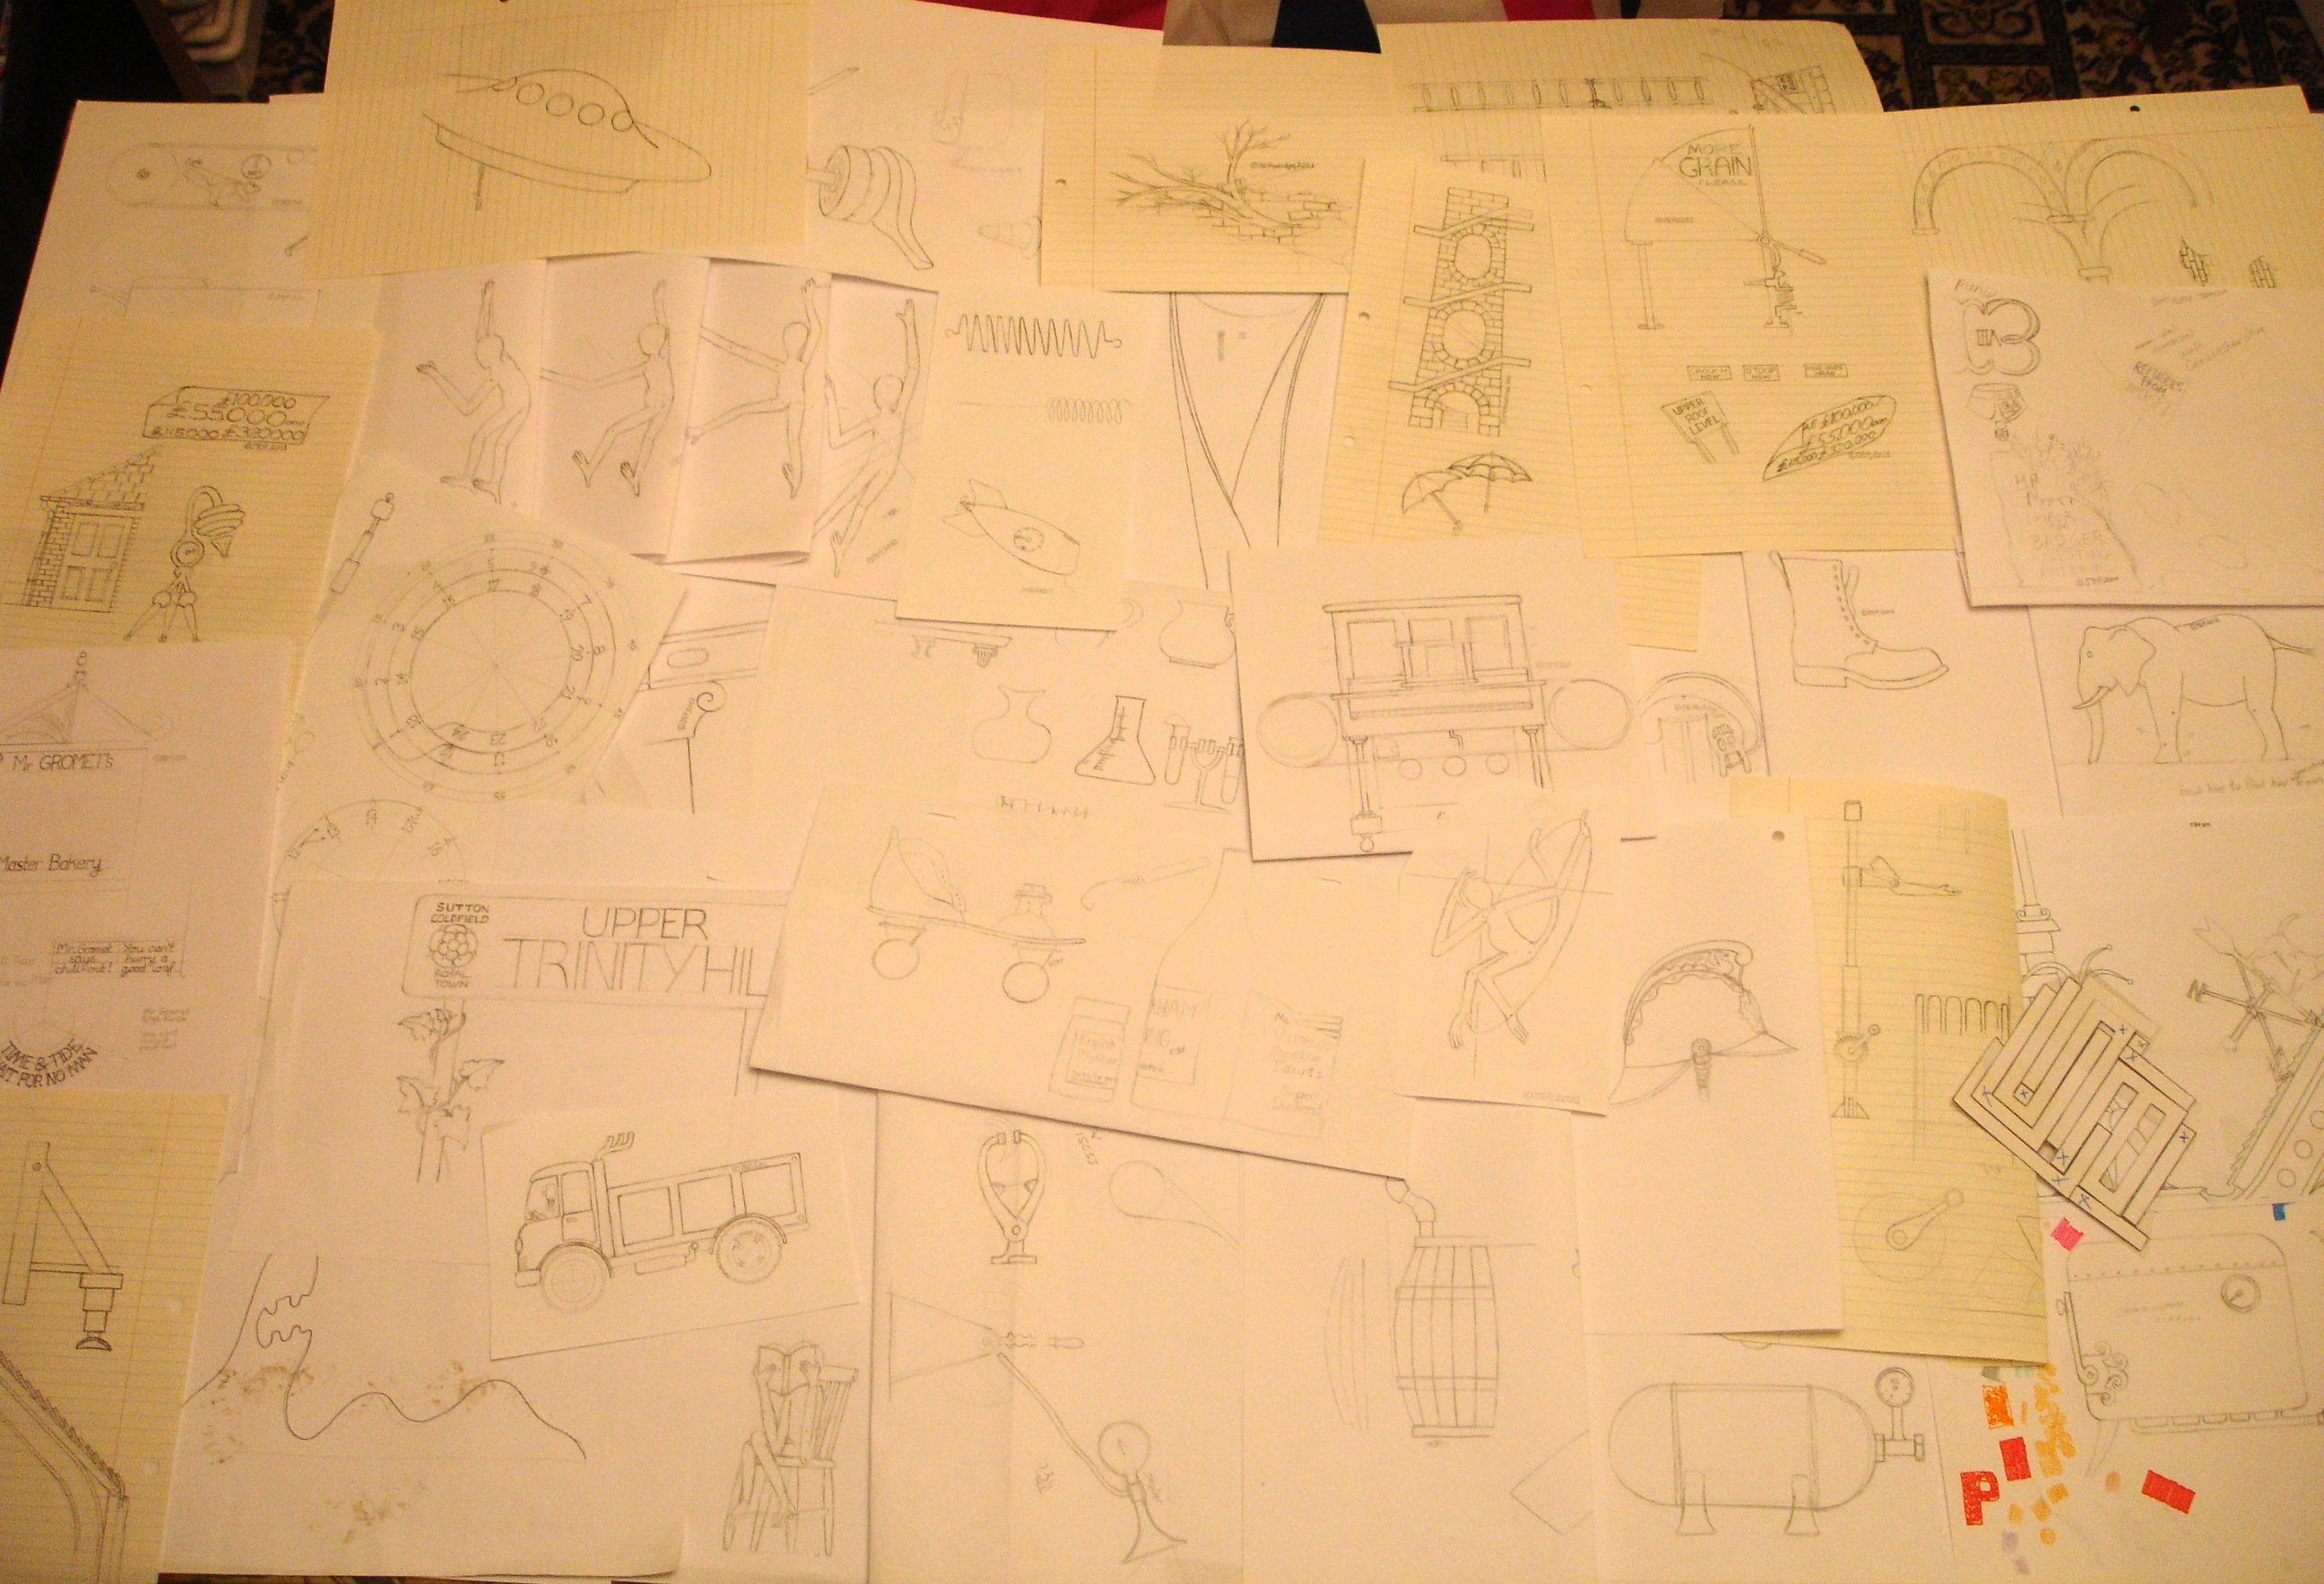
I think I ended-up doing about a quarter of the drawings on paper and the rest on computer. Below is a selection of those drawings done on paper.

Writing the Vectorization Software.
I used FreeBasic to write my vectorization software. FreeBasic is pretty bloomin' good, I recommend it.
I 'drove' FreeBasic pretty hard too with all my tool programming and although it's free I never had a problem with it. It's so nice to be able to bash-out a program in Basic,
because it's so unpretentious and requires so little setting-up to get something working.
Even with hind sight it's very difficult to know if I'd used off-the-shelf software and adapted my methods to work with it,
whether it would have been quicker over all than what I did: writing my own vectorization software that worked exactly as I needed.
Difficult too, to know exactly how long writing that vectorization software took in the end because I wrote the bare minimum required to start
with then kept going back to it to add features or
fixing problems as required...I can only say that it took months of work.
I started writing the digitization software right at the start of the project which was so long ago that, as you can see from the below picture, I was still using a CRT computer monitor...
the picture shows the grain hopper: one of the first complete drawings I vectorized and was able to render in the game on the iPad
(the first version of TraptionBakery was on iPad/iPhone, the later version was for MS Windows on the Steam platform).
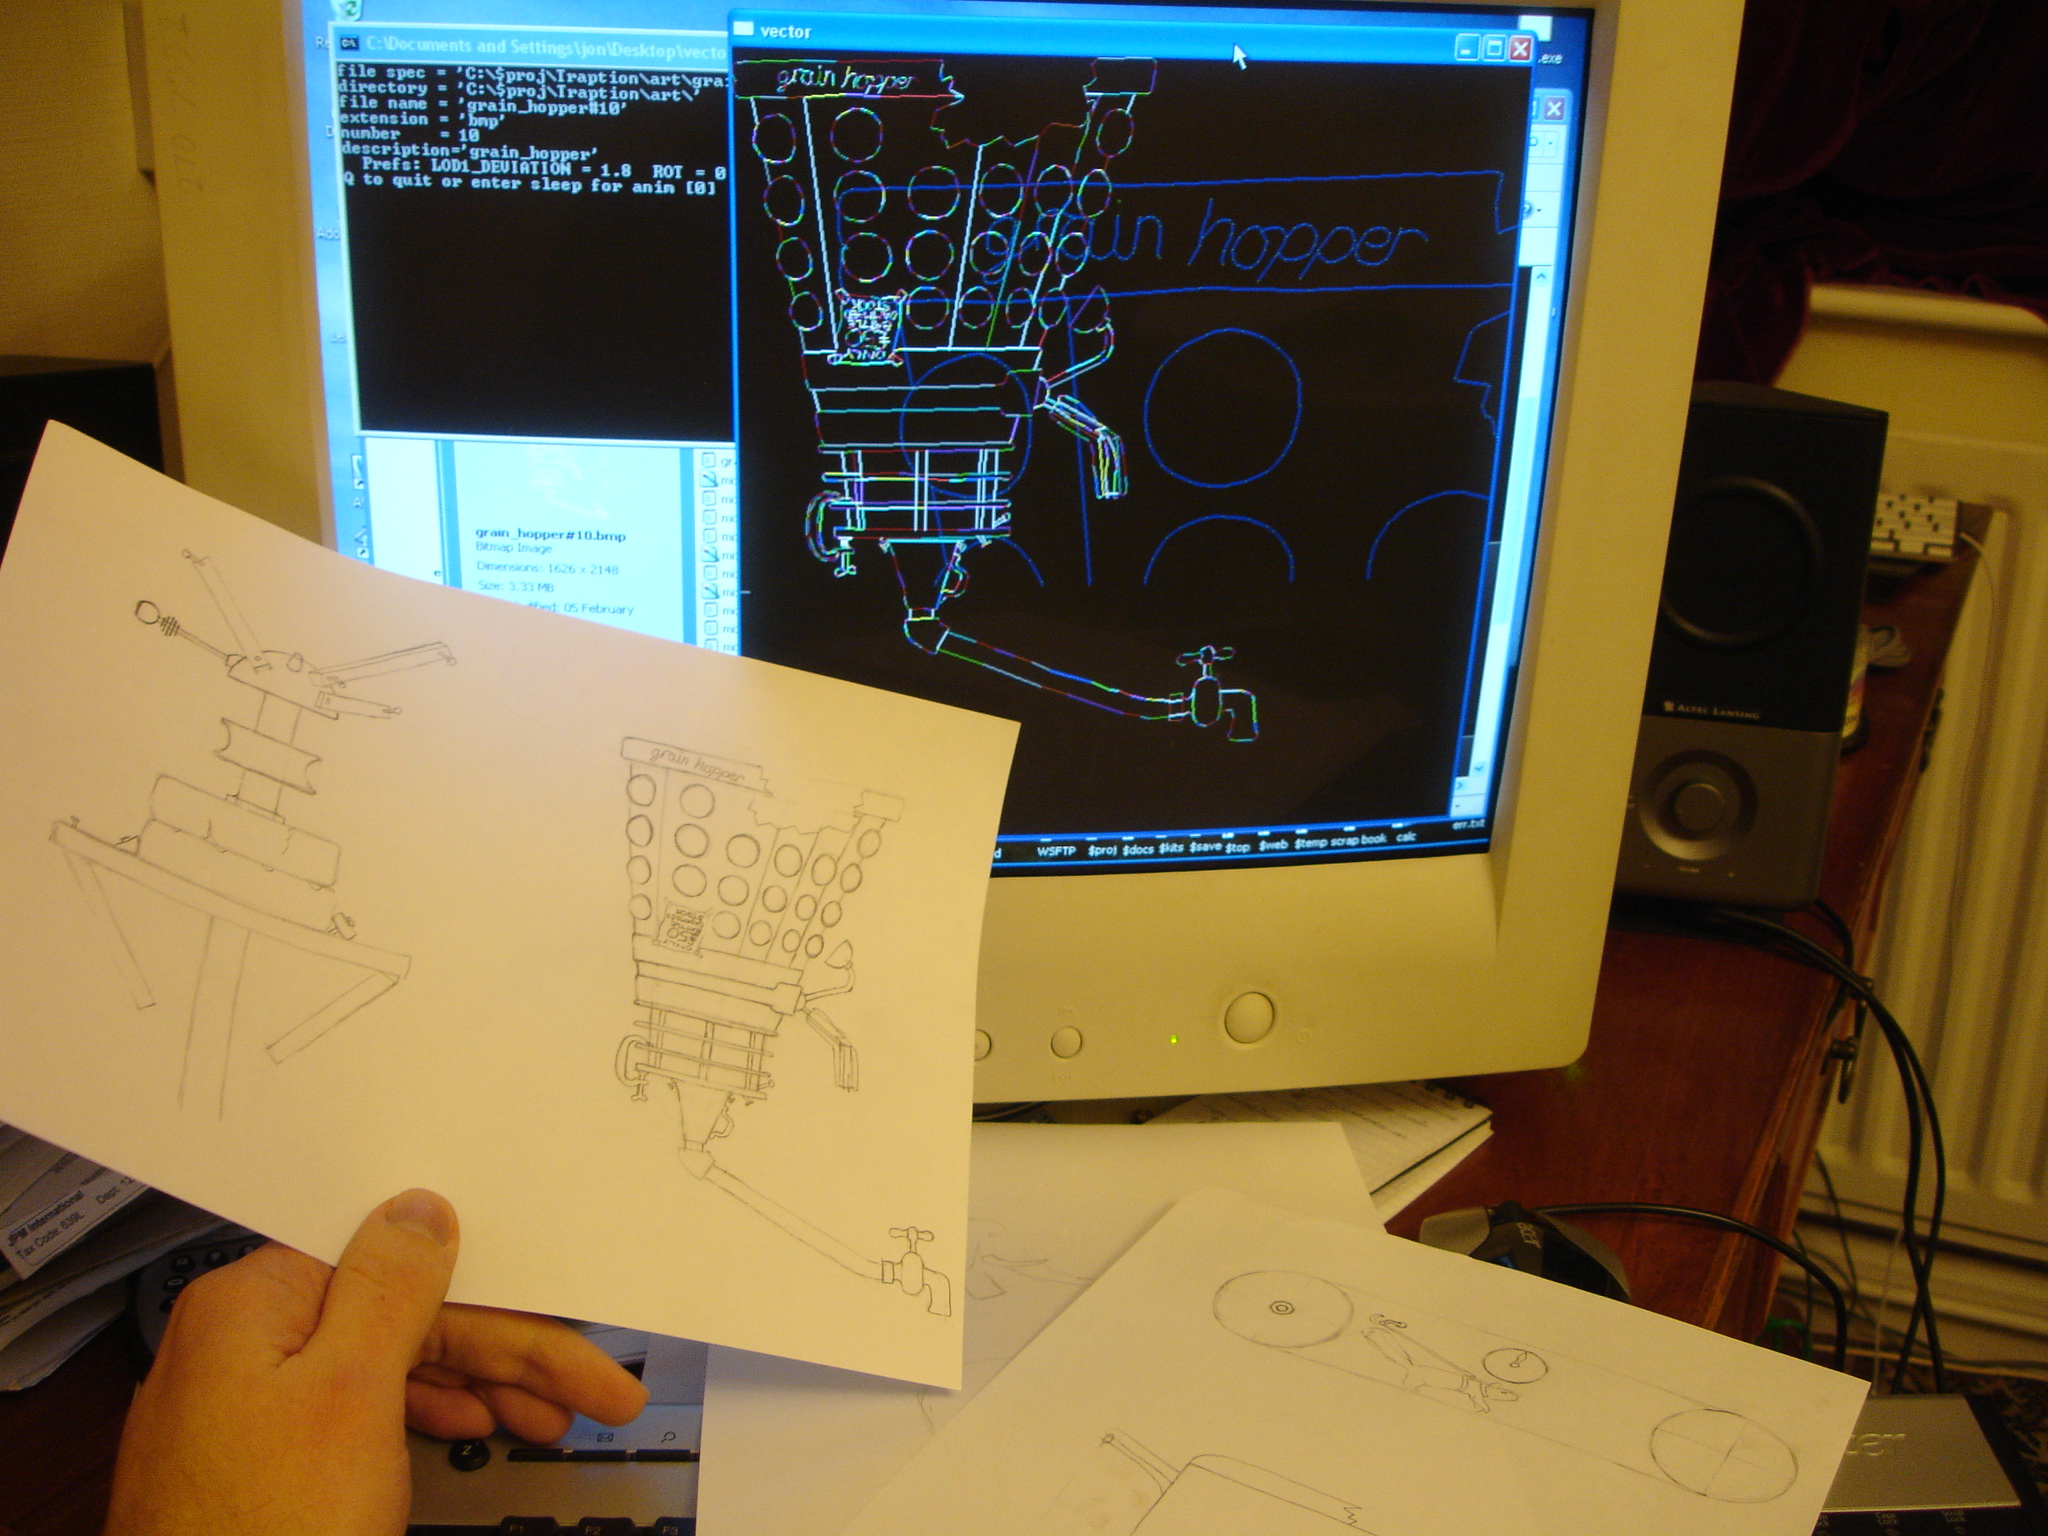
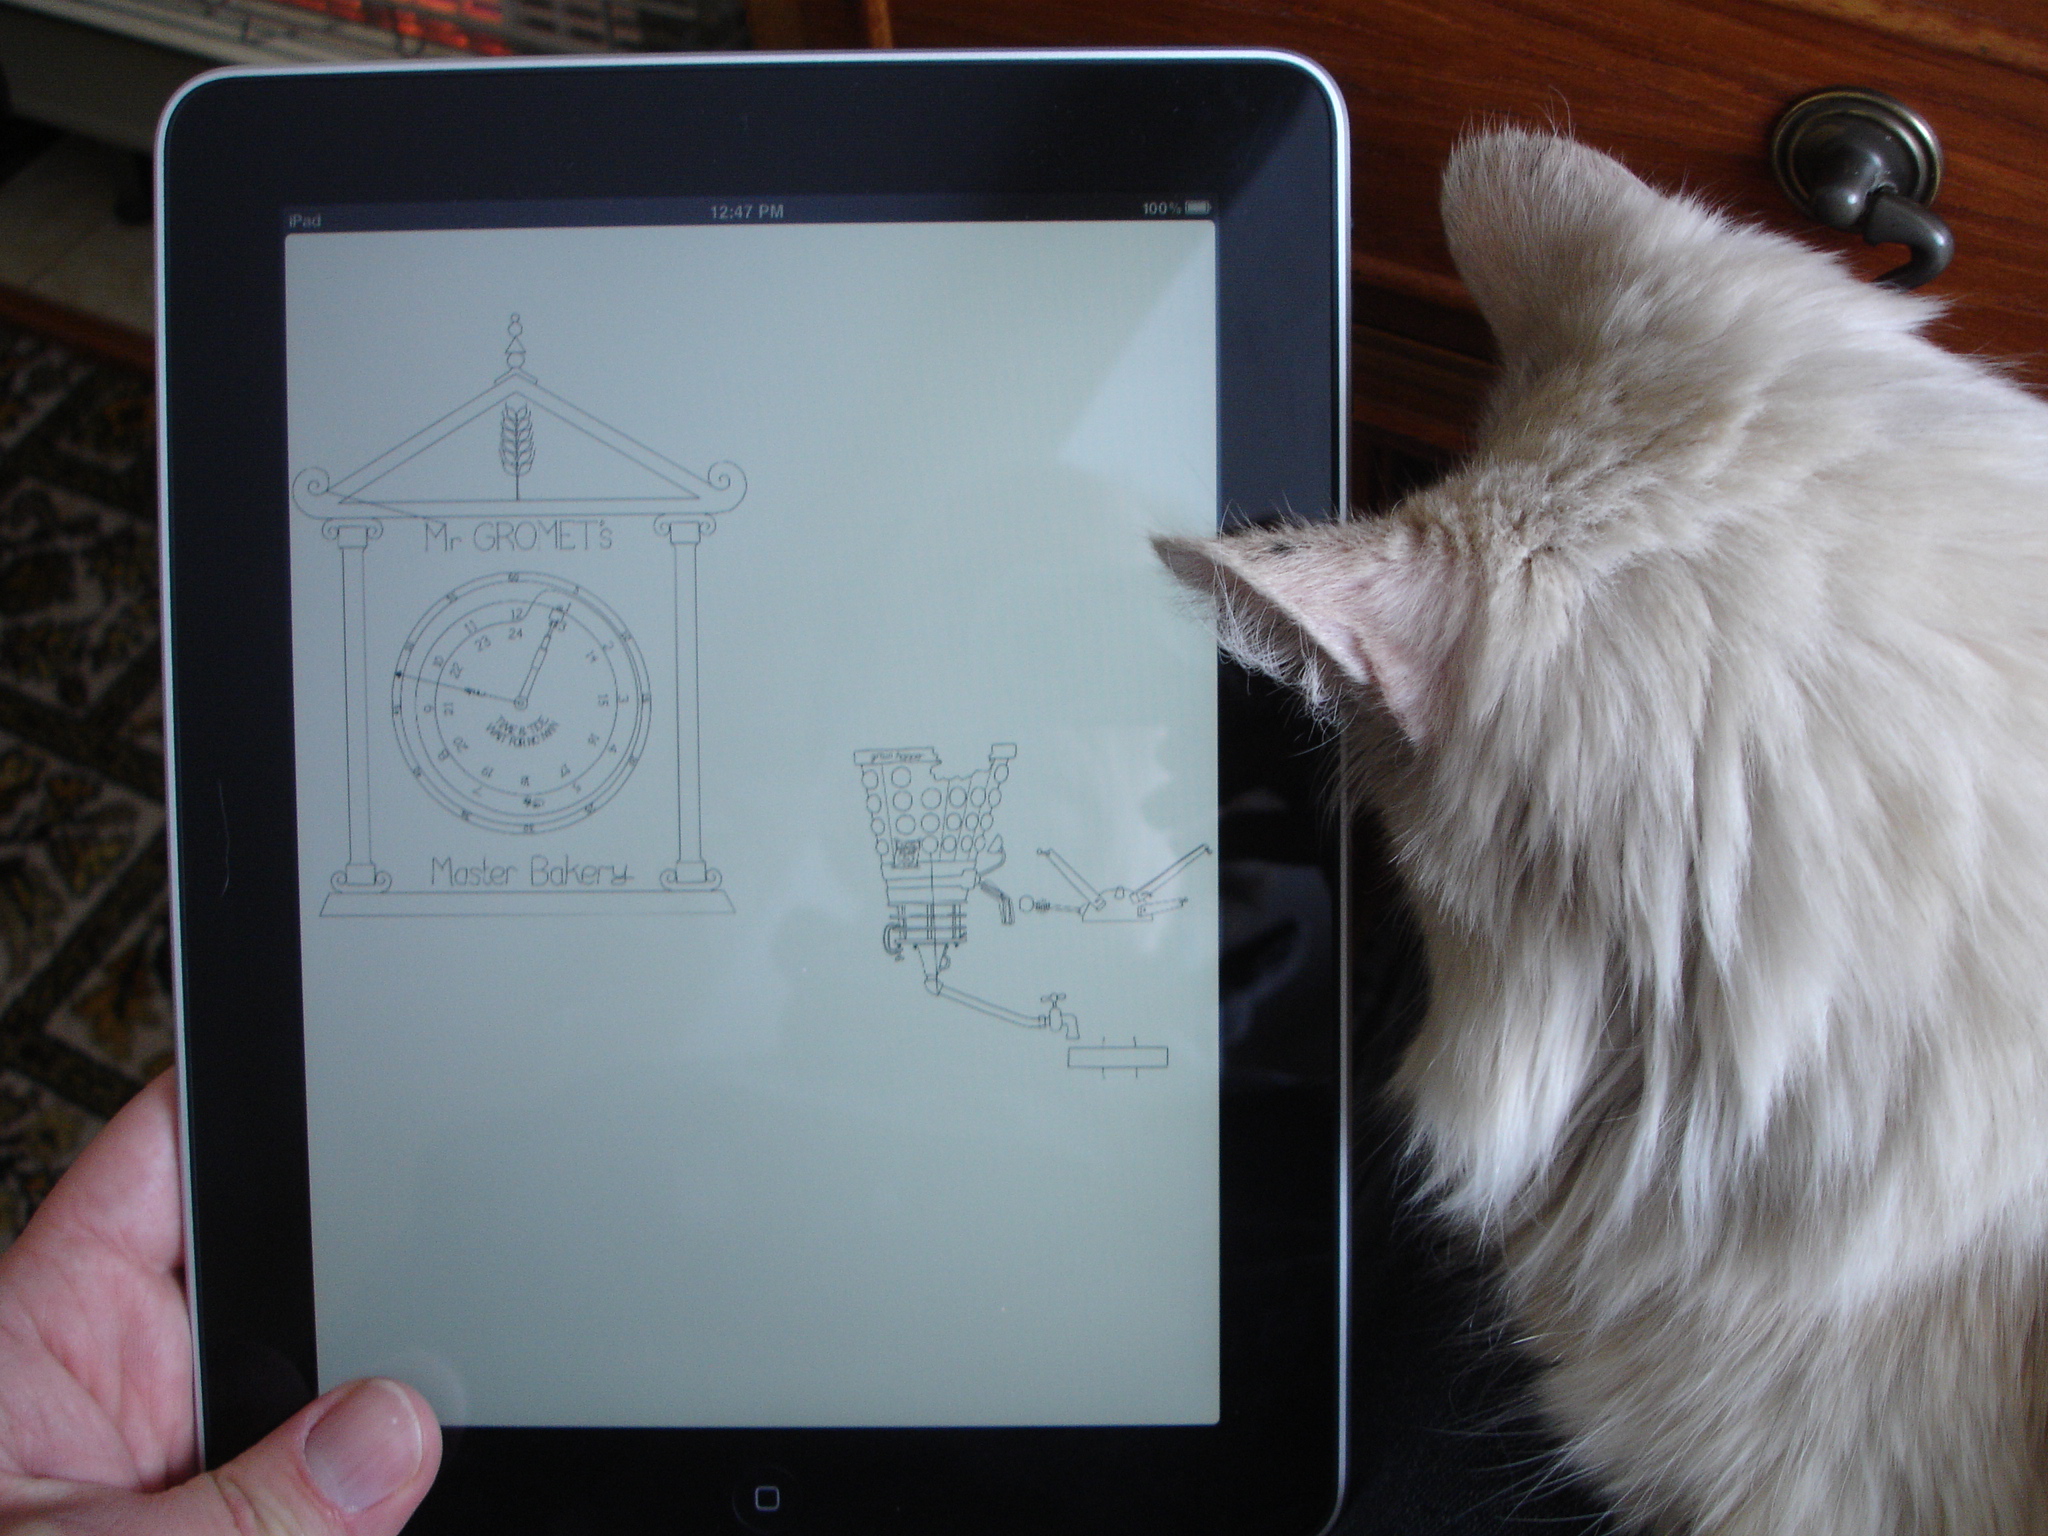
Above is the drawing converted to vectors and arcs and below is it rendered on the iPad along with the factory clock.
To render the vectors and arcs, I had to also write code (in Objective-C) in my game to actually read-in vectors and draw them to the screen.
As you can see (below) in those early days, there were some bugs (e.g. see the superfluous vertical-ish line on the lower half of the grain hopper).
This is how the game looked for quite a while in the beginning while I made countless tweaks to the vectorization software.
Sumpy the Cat is the fury thing on the right of the picture...in this picture he is more interested in what might be going on behind the iPad, but later on in the project
when I did the animation of the squirrel inside the knock-back piano he was quite fascinated with it and would paw at it, sometimes
swiping the whole image off the screen, and then he would try and look round the side to see where the squirrel had gone.
(Sumpy is short for "Sump Oil" of which he often had a streak of down his back from being under car engines to keep himself warm in the winter when he was a stray moggie.
He still continued the sump oil habit after we adopted him, although instead of a streak of sump oil on his back it would then be an off-white smudge where
we had not totally managed to clean it all off.)
Sumpy was a constant companion of mine during the development he would usually be sat on the chair beside me. He had been 'done',
so he was done with rutting and this was how he chose to spend his retirement.
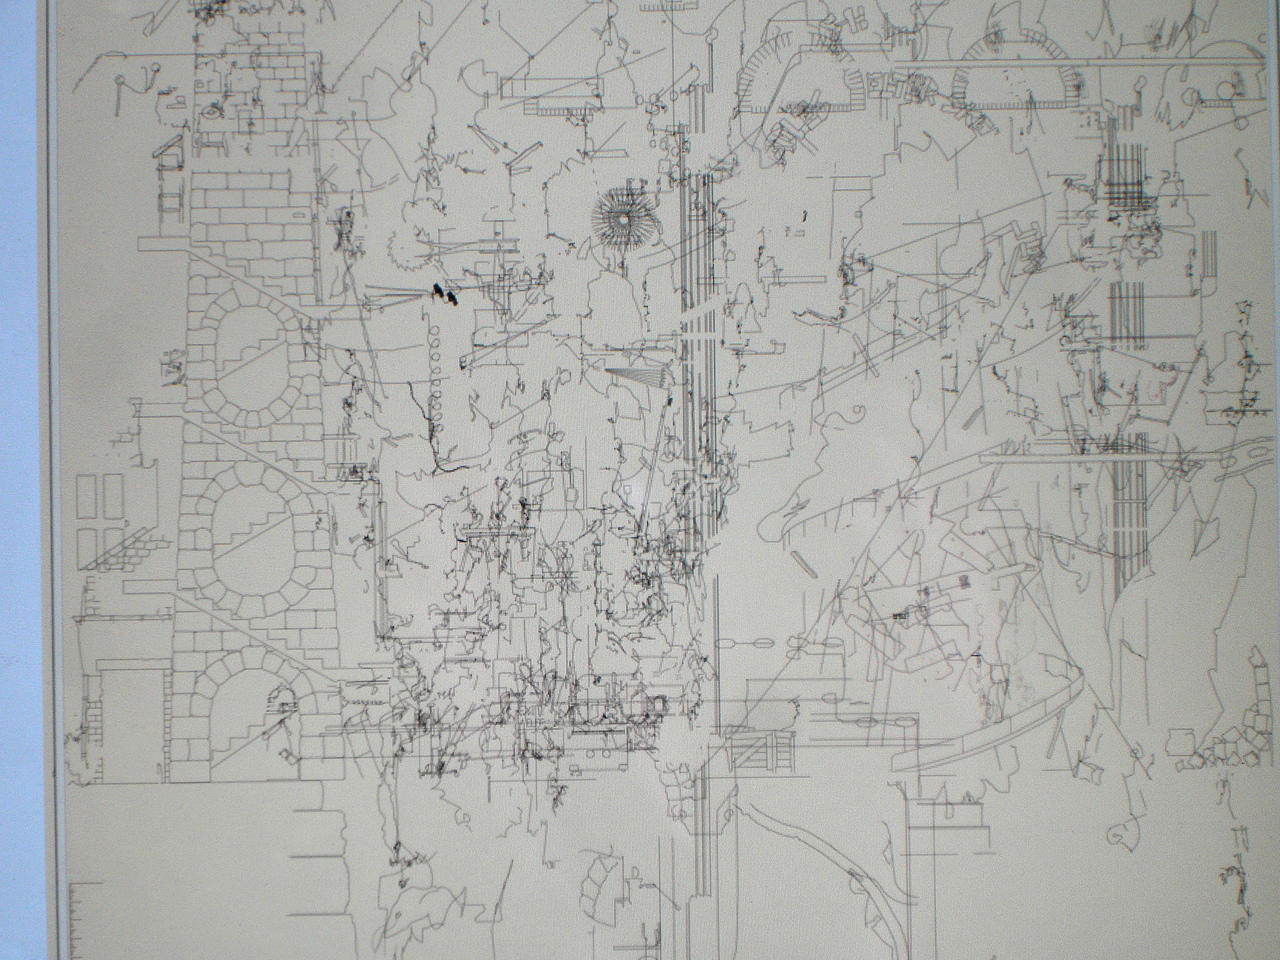
The bug in the above picture manifested itself in a small way but sometimes even a tiny error in the vector file, or in the code in my game that interprets it,
would cause the rendering to go haywire on the iPad as with the below example:
Most of the work in writing the vectorization software concerned arcs. The part that created the vectors (straight lines) from each drawing I did very quickly, but making it fit the arcs onto the curves in each drawing was tricky to say the least. Sometimes I think that I should have left the vectorization software as literally just that: have it only make vectors to represent the scene, with no arcs, accepting that you would see some flats on curves if you zoomed-in, because it would have saved loads of development time that I could spent on the rest of the game instead. And in this new world of indie games with all sorts of standards and textures of artwork being used for graphics (rather than all developers going all-out in the race to realism) the vectors-only graphics would have been seen as a different form of aesthetic rather than poor programming. I thought first of using B�zier curves to implement curves because the iPad/iPhone supported them. But for a number of reasons I chose to use arcs, one reason was that B�zier curves needed control points which would've had to be stored as real numbers and would have taken-up a lot of space in the vector file. As it is the arcs are very efficient to store -- they only require just one more byte of memory to store than a vector. For each vector, in the vector file, all I store is an end point relative to the previous point. Since most vectors are less than 64 pixels in length I can store each vector's end point, i.e.: x and y, in just two bytes because I store everything as integers. So each vector consists of just a relative end point, and each arc is stored in the same way but with the addition of one byte holding a number from -31 to +31 describing the arc. It turned-out to be more than enough to have just 31 different curvinesses to describe an arc's curve, (making it negative for a curve in the other direction). A curve of 1 (or -1) is very shallow, almost a straight line, and a curve of 31 (or -31) is a semicircle.
Using integers and using arcs instead of more complex curves, plus other optimizations, enabled the vector file, that contains every bit of drawing you see in the game within the picture frame, to be super-compact only taking-up 1 megabyte of space... and for example, by comparison, the MP3 file of Jim's music takes-up 8 megabytes.
Another reason I did not use B�zier curves was because they would have been too smooth, they would have smoothed-out all the imperfections that gave the graphics the hand drawn look. Hmmm, now I come to mention it, I remember the "hand drawn look" was another can of worms. The thing was that using arcs also took-out a lot of the hand drawn authentic imperfections, as did the vectors for that matter... but co-incidentally because the fitting of the arcs and vectors onto the hand drawn lines was not perfect, my vectorization tool added-in as many imperfections as it took-out... and by luck these imperfections looked as authentic as the ones it removed. But I worried about this for a while: because the imperfections generated by my software looked authentic but were actually computer generated.... I thought this was essentially fraudulent (fraudulent by the the ridiculously high standards I set for myself and nobody else, for some unknown psychological reason). But then I thought: they are actually as good as genuine imperfections because I wrote all of the vectorization software myself from first principals, I did not even cut'n'paste any small algorithms off the internet or look for methods of vectorization... so all the imperfections are mine, unintentional, and peculiar to me and so are human.
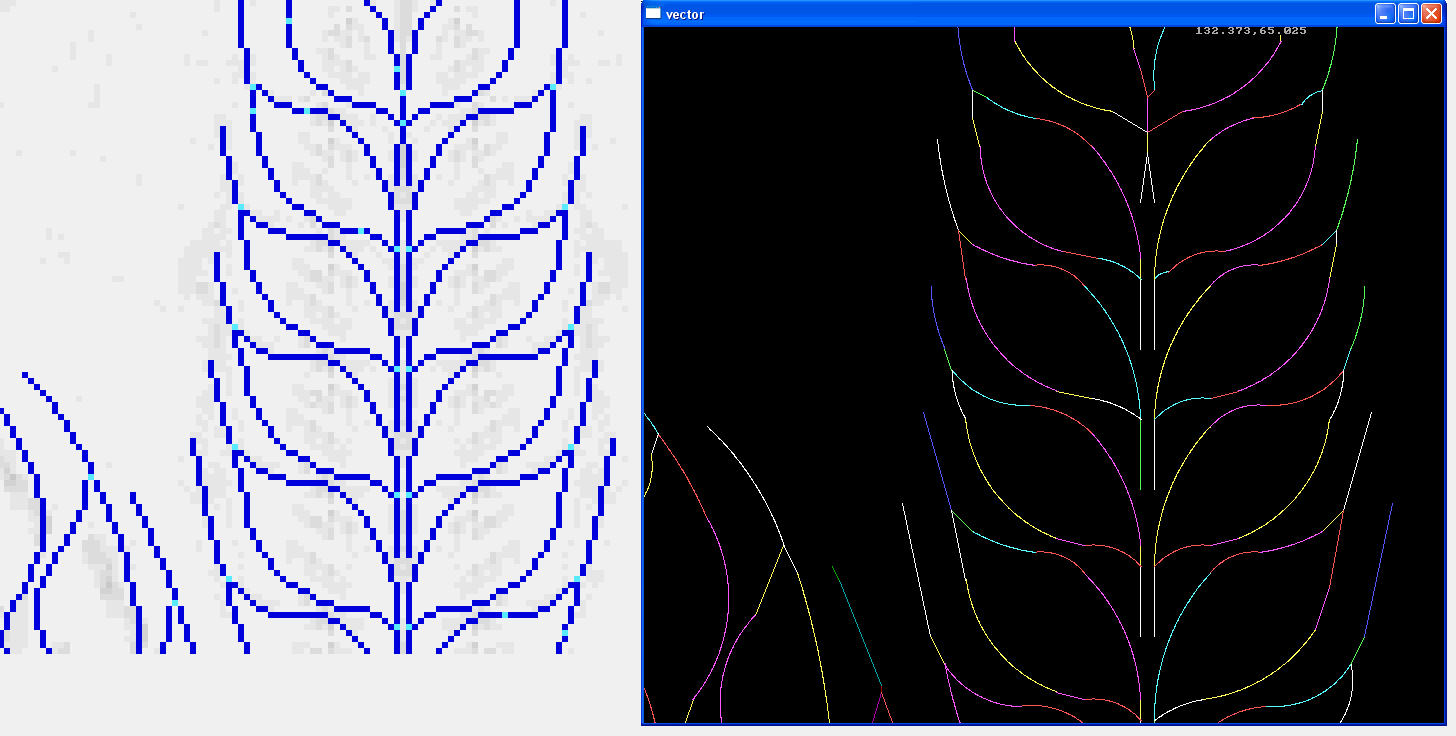
Below is a drawing I vectorized quite a lot as a test when I was developing my vectorization software, and it is quite tricky to get it to follow the pixels in a way you
would expect it to as a human. A lot of the bugs turned-out not to be bugs, in fact it was the software placing vectors and arcs in totally logical and reasonable places
but it just wasn't what was expected by me: the human.
Level of Detail.
One enhancement I did later in the project was for "level of detail".
What it does is write a second version of each drawing to the vector file at a lower level of detail for when you're zoomed-out of the picture
(as if viewing the scene from a further away).
This reduces the number of vectors the computer has to draw when you're playing the game
to help compensate for the fact that the more you zoom-out the more of the scene becomes visible and the more
vectors and arcs the iPad has to draw.
Below, the picture on the right shows what vectors and arcs are drawn in the game normally when you zoom-in.
The picture on the left shows what is drawn when you are zoomed-out -- note there are less vectors in the left hand picture
so it is quicker to draw plus, there are no arcs
which makes it even quicker to draw since arcs take more time to draw than vectors.
As you zoom-out in the game it will change to the lower detail version but in theory you will not see this reduction in quality.
(Interesting: stand back from your monitor or smart phone, maybe as much as 10 or 20 feet if it's a large monitor,
go further and further back and you will notice
there is a point where the left and right pictures above come to look the same.)
I had thought early in the project that I would be able to do this level of detail processing in the game as it drew the scene, but I was very short of CPU on account of there being so many thousands of vectors to read-in and draw, so I had to do most level of detail optimization in the vectorization software instead. So the computer running the game has most of the work already done for it: the level of detail optimization is stored, pre-canned, in the vector file... all the computer running the game has to do is decide whether to show the detailed or rough version depending on how far you are zoomed-out. Actually I did also put some basic optimizing in the game so that it draws fewer vectors or arcs the further you're zoomed-out: but this was very simple stuff so that the code executes quickly... things like: if a curve is a very shallow one and you are looking at it zoomed-out far enough then it instead draws it as a straight line (which saves on GPU time). So the optimizations the vectorization software precanned into the vector file worked in conjunction with the ones in the game's rendering code for even greater efficiency, making it possible to display the whole scene of [what would be], maybe 200 thousand vectors and arcs.
I had not considered, at the start of the project, that I would have enough CPU and GPU to display the whole scene animated, I thought I would have to limit the amount you could zoom-out so that you would be able to see a maximum of about an eighth of the whole scene. It was when I realized that there was a good chance of being able to display the whole scene, thanks to the optimizations, that I thought of displaying the scene in a picture frame.
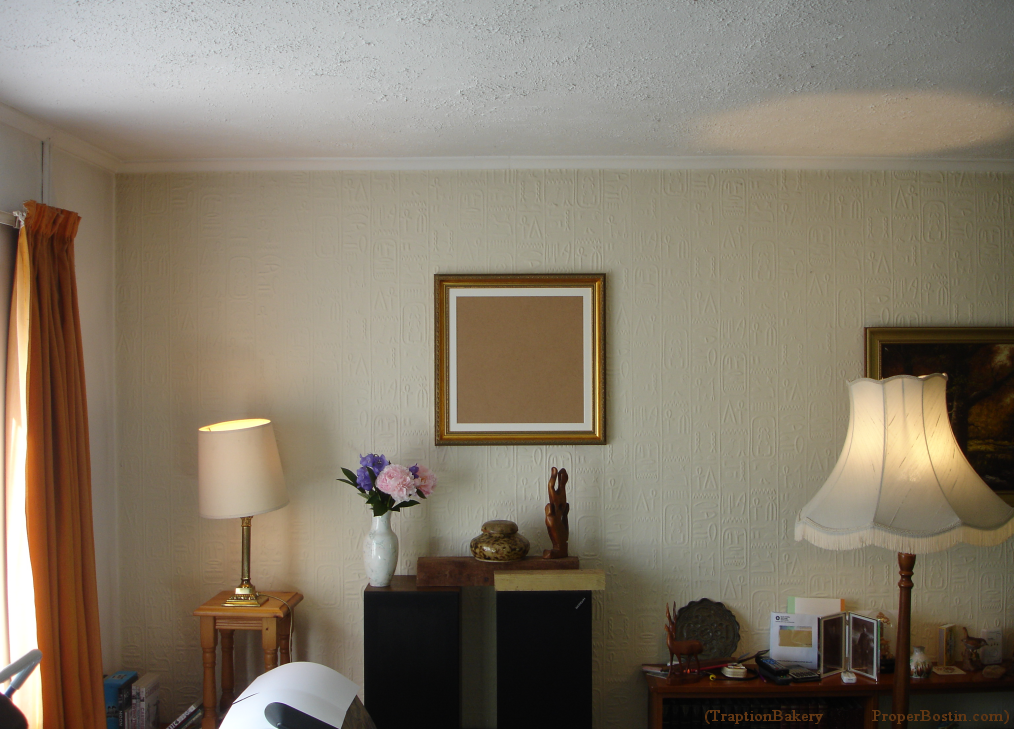
Framing the Scene.
Once I had decided to have a picture frame in the game, one extra task was to get a picture frame made and hang it on the wall and photograph it...
then edit and transfer the photo of the picture frame into the game which would draw-on the vectors and arcs that make-up the scene inside the frame.
So the frame, when I photo'ed it, would have no picture in it.
The fact that I had no physical picture to frame, or even the dimensions of one, flummoxed the local picture framer I went to, no end.
I told him I wanted a square frame, 24" external size but that didn't seem to be information he could deal with.
But after showing him a mock-up on an iPad and much explaining, he did eventually get the idea... I thought.
I thought it would be nice to use a local picture framer...
I could put them in the credits, I thought, and maybe they'd get a bit of extra business if my app did well,
but supporting a local supplier in this particular case turned-out to be a mistake: the trouble was
the bloke in the shop wasn't the one doing the actual picture framing and whatever he wrote on the job sheet failed to
explain to the actual framer what was required.... so whenever I went back to fetch the frame I would get some sort
of explanation like:
"Oh it's not ready yet because Bill didn't know what size the picture was." or:
"Oh I don't think it's done because we were a bit confused as to what you wanted."
I just started leaving it longer and longer between visits as my pessimism grew about the whole affair.
After about 4 visits over 3 months (walking the 2 miles there and back
because my car's not insured for business use) I just gave up and wrote-off the eighty quid I had paid for the frame in advance.
So in the end, I just ordered it on the internet (ezeframe.co.uk) selected what I wanted and typed in some dimensions and it came within
three days with no fuss and for about half the price. Oh well.
So once I actually had the picture frame in my possession I had to photograph it. Because all the game graphics were orthogonal (viewed perfectly side-on with no perspective) the picture frame had to be photographed in a very similar orientation for the illusion to work well. So it couldn't be hung like a normal picture because it might tilt forward at the top by a degree or two. So I decided to stick it flat to the wall with Blue Tack. I remember mentioning the Blue Tack idea to that picture framer bloke all those months previous and he went from looking quite confused (about the prospect of framing a non-existent picture) to suddenly looking quite alarmed: "It'll be quite heavy you know." he said. I tried to allay his concern by pointing out that it only had to stay-up for about half an hour while I photographed it. His look went back to one of confusion, I'm guessing his internal monologue was going something like: "Why does he want to buy a picture frame he's only going to have up for half an hour?". It's at this point I should have realized that he was never going to get a handle on what I was trying to do, or more importantly what I needed from him, and I should have just left and saved myself 80 quid and a lot of waiting.
I did a little test run and tried sticking the frame to my Mum's lounge wall. The Blue Tack stuck very well and the problem then was how to get it off again. I tried pulling it and started to hear the wallpaper delaminate from the wall (sort of like a paper ripping sound but more crackly). Oops. So I had to get a knife and carefully cut into the Blue Tack and then remove it. So then it was a case of waiting for a sunny afternoon (because I had determined the light would be from the required direction at 5 in the afternoon) for the actual photo shoot. A week of overcast weather made it seem like I waited for ever but it gave me plenty of time to prep it by doing things like drawing feint lines on the wall in pencil with a spirit level as a guide for getting the frame dead level and square, and experimenting with different heights for the picture and camera. Anyway a nice sunny day came and I set everything up. As well as the Sun coming-in through the window I put on various lamps too which increased the light that last little bit. I stuck the picture on the wall and everything went according to plan. I had to keep taking test shots and adjusting the horizontal angle of the camera, ever-so slightly, so that the picture frame appeared exactly square in the photo right down to the pixel level. I had taken a few good shots and I was just in the process of taking a few extra just for good measure when.... the picture fell off the wall. Oops. To her credit, my Mum who, like the picture framer had also expressed concerns about the adhesive powers of Blue Tack, did not say "I told you so." Fortunately nothing was damaged as it fell, slid down, onto those hefty wooden blocks you can see in the below picture that I used for placing some ornaments at the correct height. Well I suppose everyone was right really, because it had stayed-up for half an hour... and then fallen off.
In the below picture the pink flowers are peonies and the purple ones are called something like "Canterbury bells",
they grow wild in my Mum's garden and I can't quite remember their name for sure. By coincidence she had just picked them an hour earlier.
Next right is a pot my Dad made probably about 30 or 40 years ago and next thing along is a wooden carving I did at school when I was about 14.
The hieroglyphics wallpaper, as far as I remember, was pasted up-on that wall in the late 1970's and has stayed there ever since because we liked it so much,
it has been painted a few times though.
I think it might have been made by Anaglypta but I'm not sure.
The Music.
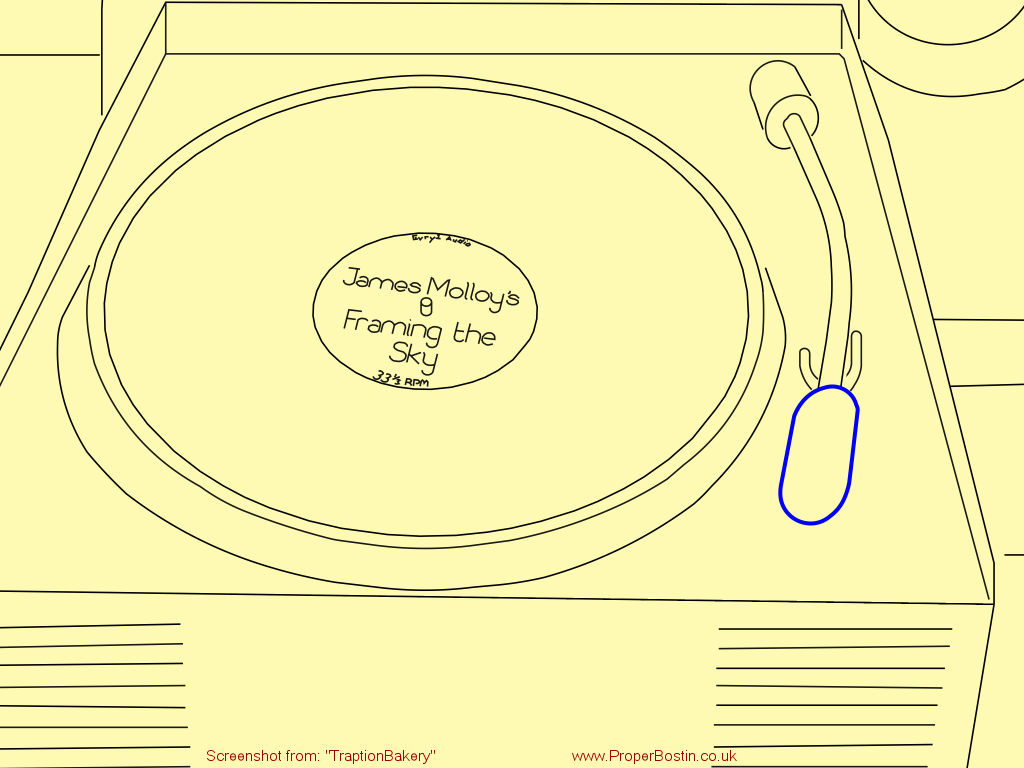
The background music is a track specially written by James Molloy.
As with the last project ("Who's Making the Tea") I gave Jim the specification for the music informally over a cup of coffee in some cafe or other probably
one next to New Street Station.
It's a simple process for me, all I have to do is tell Jim the mood and subject and things like that and he comes-up with exactly the right thing...
I think this time I said that I wanted something contemplative, relaxing,
positive and something that wouldn't compete too much with the clunks and whirs etc of the bakery machinery (only because they're needed for feedback),
and he came-up with his "Framing the Sky" track. Spot on.
If you haven't got my game to hear it on then you can probably find it on Jim's web site www.jamesmolloymusic.com
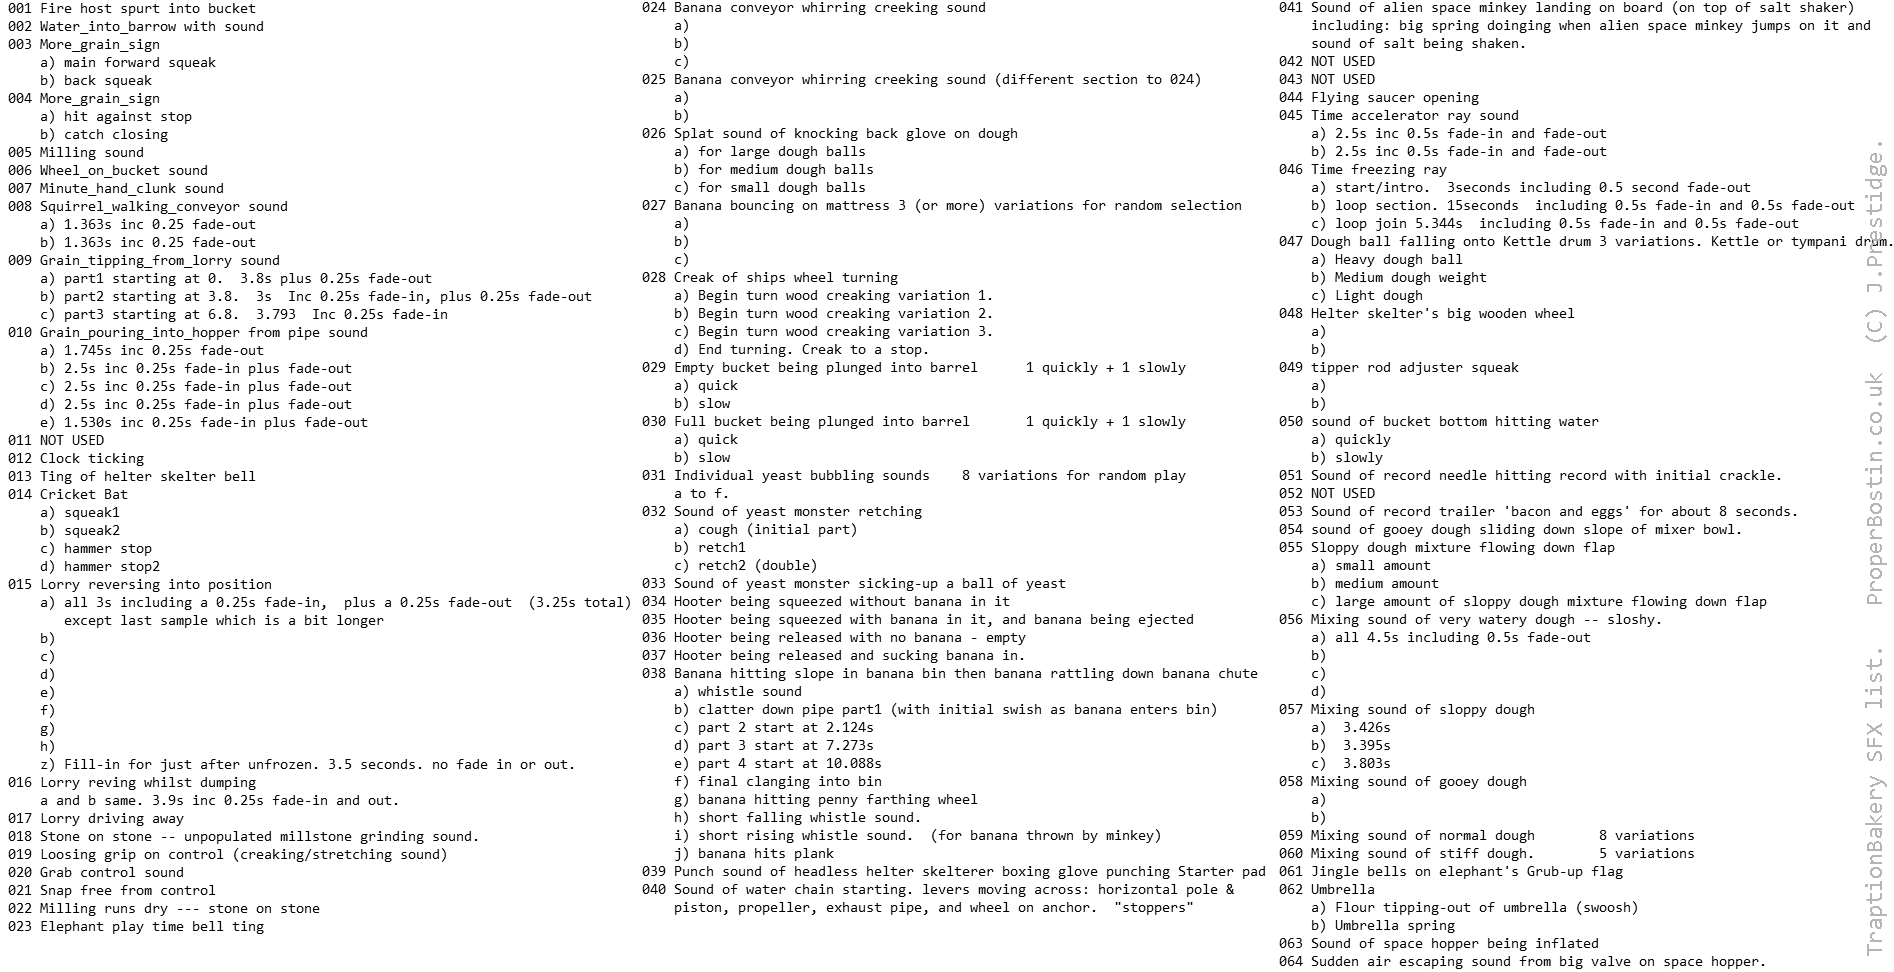
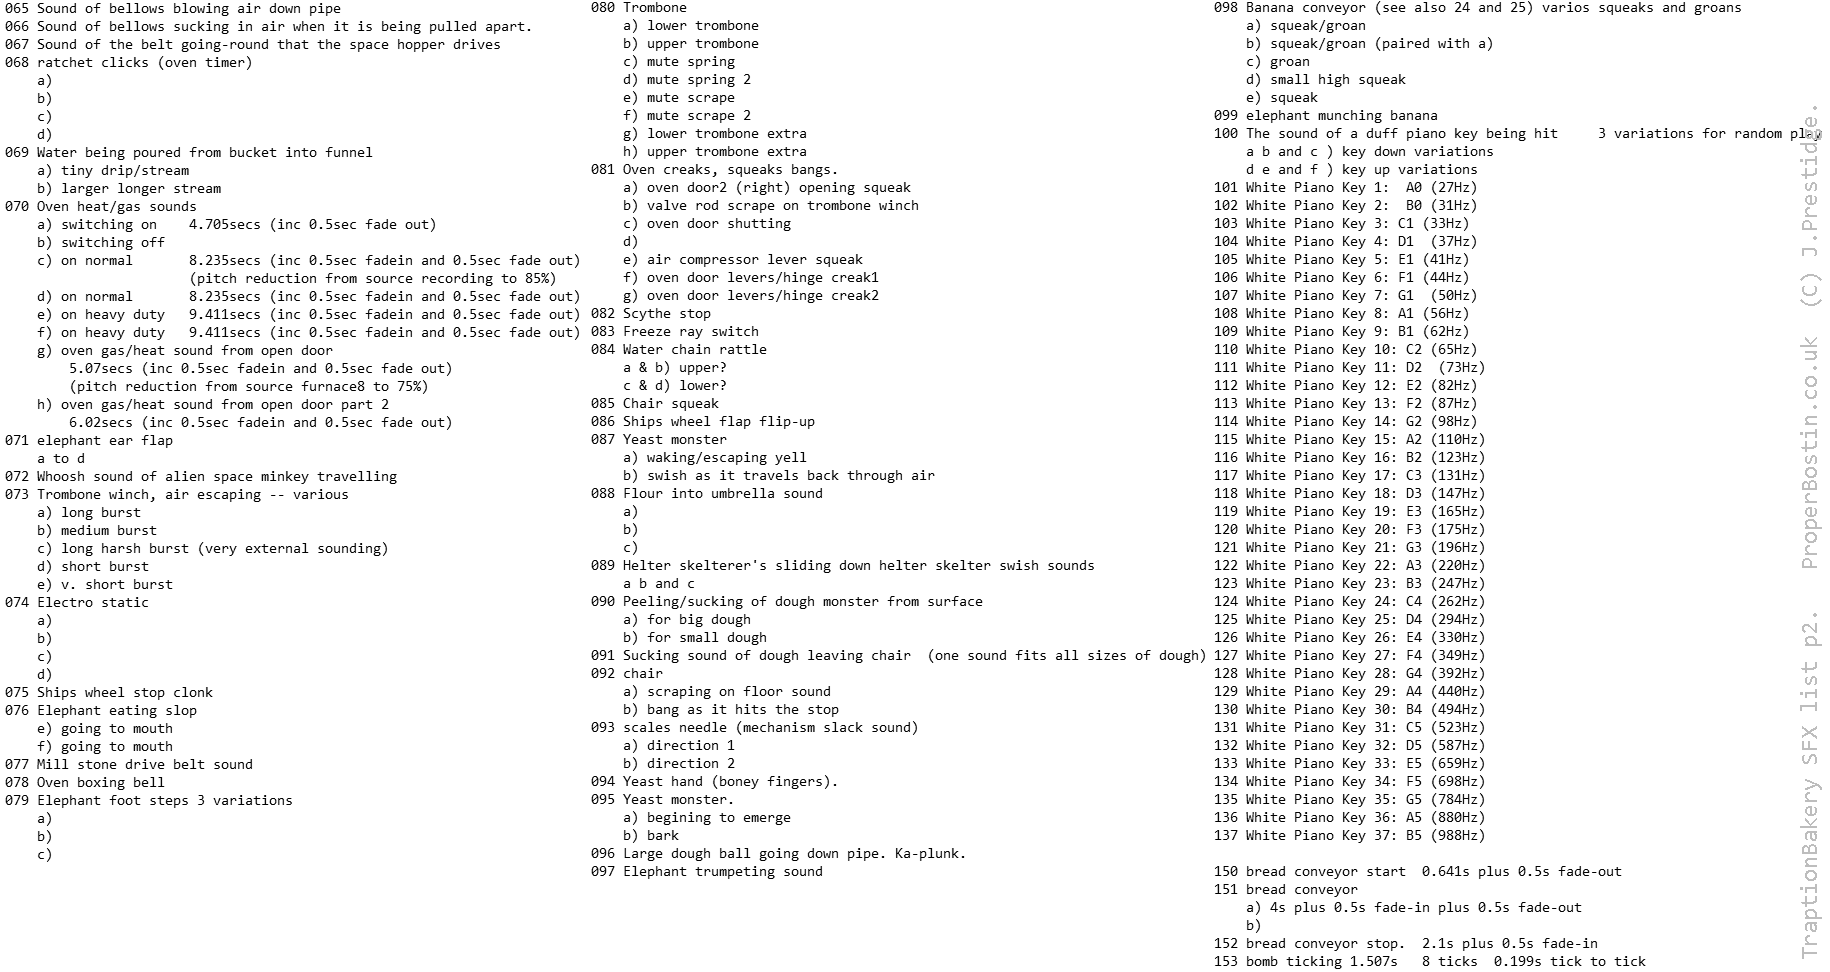
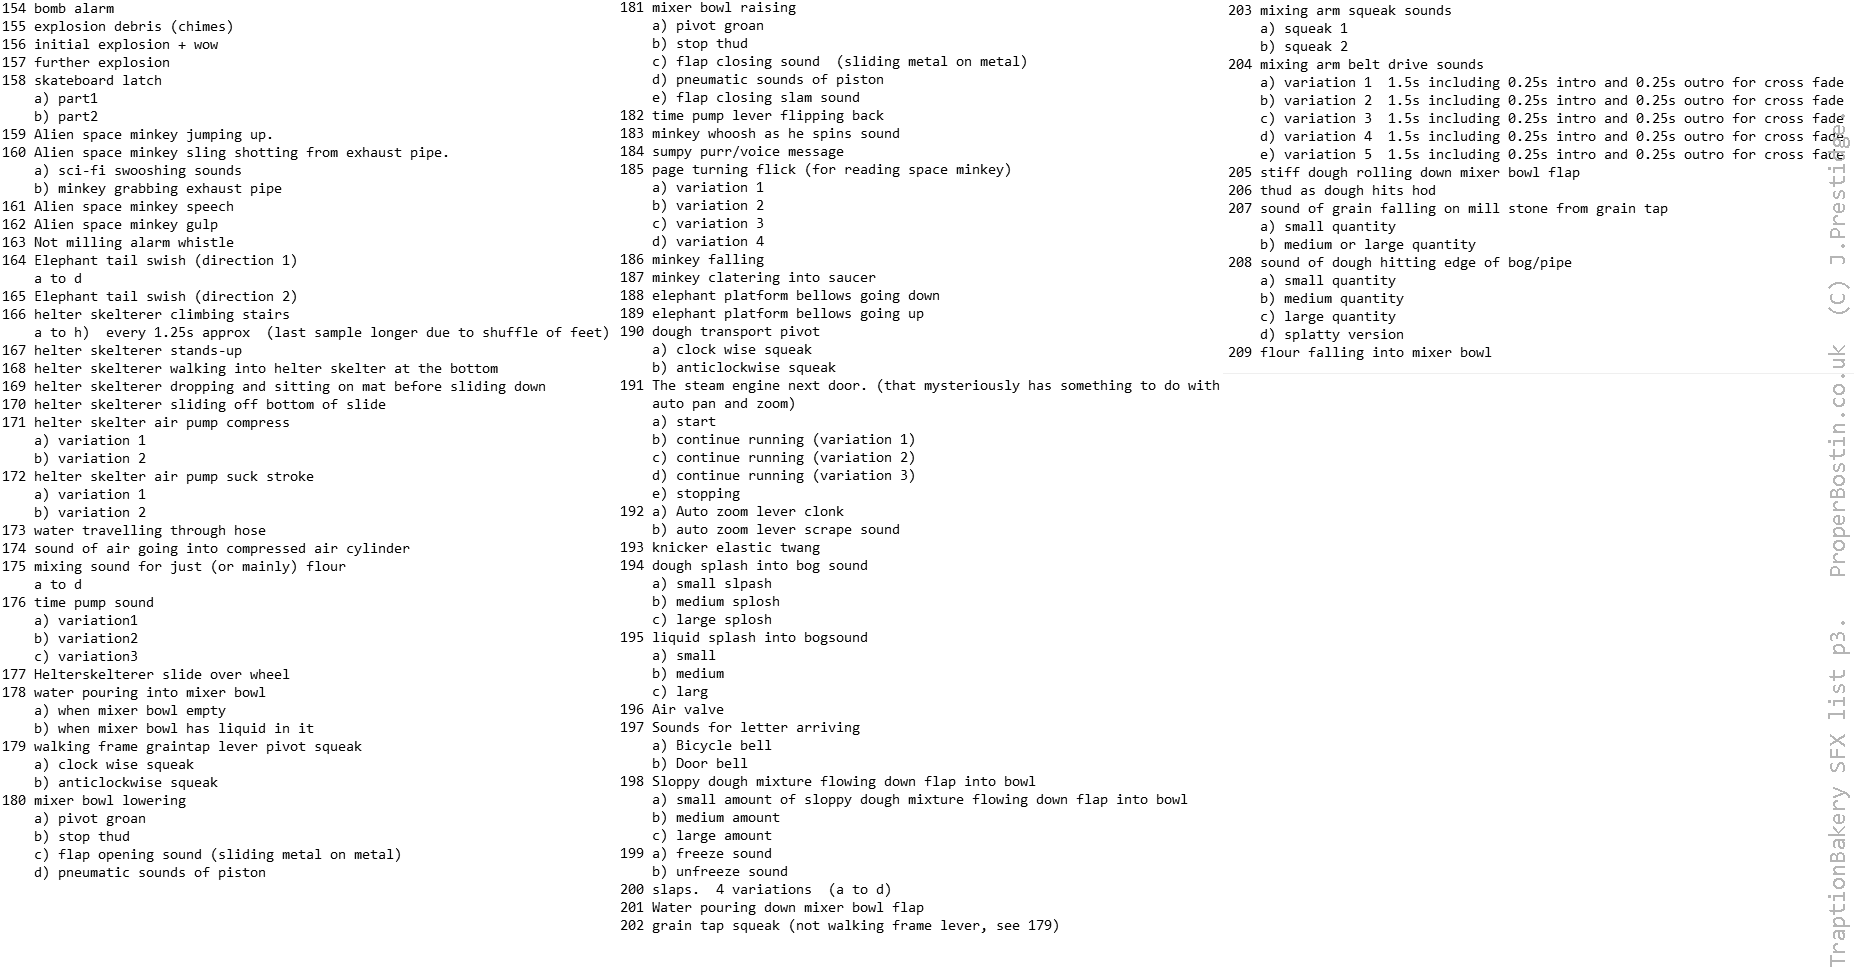
As far as sound effects go, Jim made about a hundred or so according to a list I gave him which I though listed most of the sounds I'd need for the game.
I thought I would later, perhaps, need to get another 10 sounds for things I had not thought of by that time... squeaks mainly.
But in the end it turned-out that I needed an extra hundred or so sound effects:
some I recorded, some I trawled soundsnap.com for and some I got off some AKM Music sfx CDs I have.
The most problematic and least satisfying sounds to procure were squeaks for pivots, axles, barings and hinges
for the various bits of equipment in the bakery. (I've also lumped-in mechanical groans and moans into the "squeak" term just for the sake of this article).
Jim supplied one of the best squeaks which was for the "More Grain Please" sign on the roof, but there were loads of others to get,
and I couldn't just copy that one that Jim did and use it for all squeaks because you would notice that every lever you pulled or wheel you turned had the same sound.
The large number of squeaks that were required wasn't the only problem: the tone and quality was difficult to get right --
I couldn't use just use any old squeak because all squeaks have a certain quality about them, for example the squeak of a wooden door will sound different to that of
a metal door even if they both have metal hinges (kind of like the difference in sound between a normal guitar and a steel guitar).
And a thin metal door squeaking will sound different to one made of thick metal (because the door acts as a resonator) and the ones I needed were the thick metal ones to better
match the larger chunkier heavier bits of equipment in the bakery.
Unfortunately everything in the typical home these days is made with the thinnest tiny-est possible metal so as to make for cheaper manufacturing costs,
which is good environmentally speaking ( less raw material and less energy used ) but these tinny things give the wrong sound for what I wanted,
also things made from thin metal make sounds that are not so pleasing: more grating and higher frequency, which is not what you want unless it's for a horror game.
After going round trying everything around the house and garage with a pivot I could think of and recording any that sound decent, I then went through the library of squeaks
I had in my mind: you rack your mind for those really cool squeaks you've heard over time and then, "ah ha!", you remember one and it even had a pleasing solid clunk with it,
but typically, you might then remember that the squeak was the squeak of a farm gate...
in Cornwall 250 miles away that you heard on holiday ten years ago, so even if you did motor down there it wouldn't sound the same or perhaps not even be the same gate,
then you remember that, say, the kitchen door hinge makes just the sound you want,
but then you remember that because it was getting on your nerves only last week you oiled it and it won't be making that sound again for a couple of years.
Nothing had that over engineered solid pleasing squeak or groan of yesteryear.
Sometimes you can get around sounds being too tinny by slowing-down the sound that you've recorded (making it a lower pitch) or/and filtering-out the higher frequency sounds,
which is what I did with the oven shutting sound for example, which is the sound of typical tinny modern domestic oven door made a bit more meaty in that way.
Sometimes though you can slow down a sound and amazingly it sounds practically the same, it's almost like it's a fractal sound, and you can't do much with them.
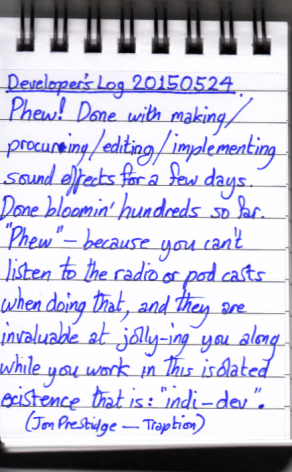

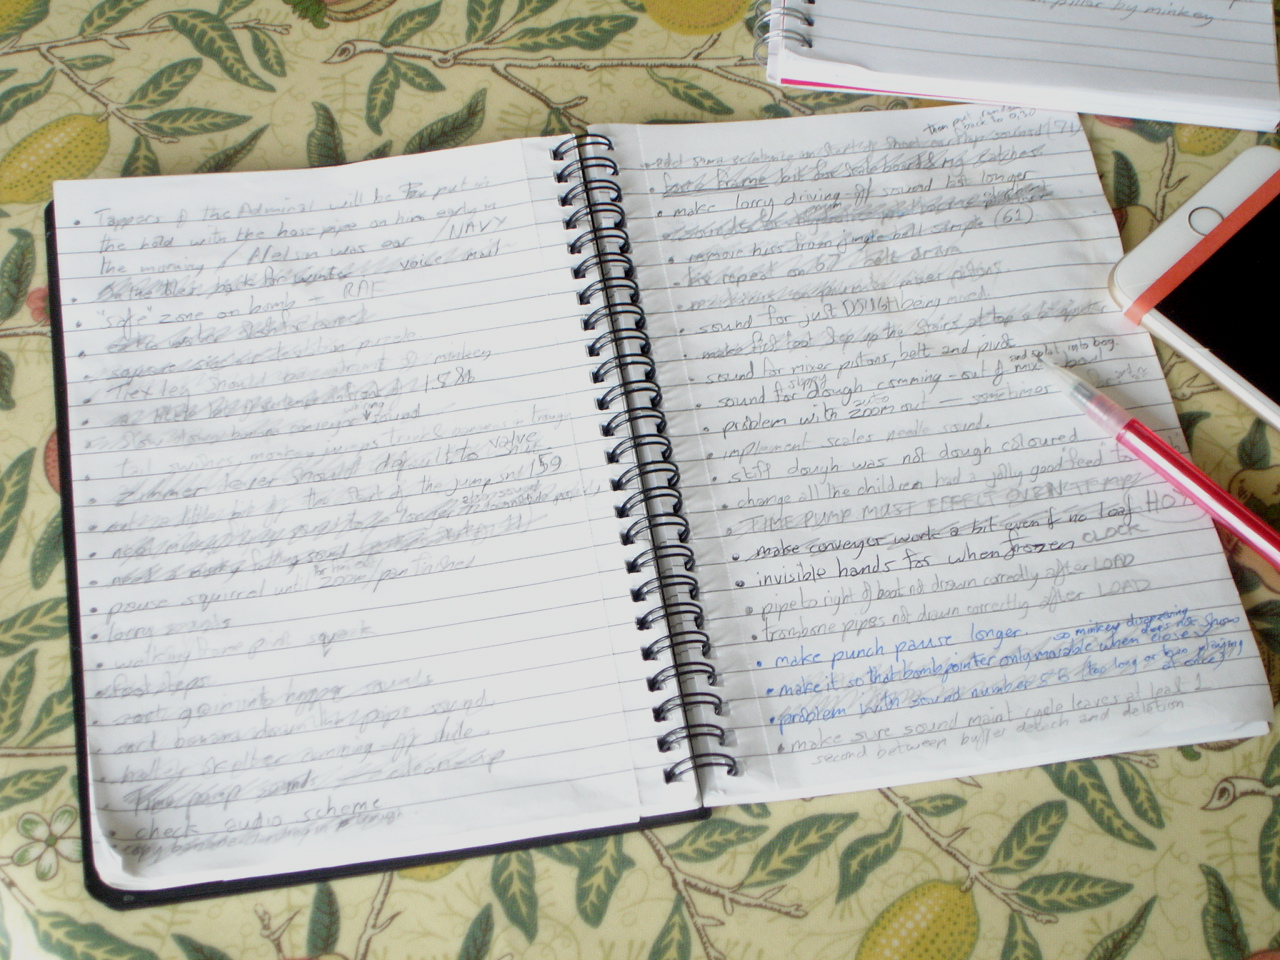
Above are two pages of a development log I started towards the end of finishing-off the sounds.
I thought it would be a good thing to do, an enjoyable distraction to tweet a page every few days... therapeutic even.
However pretty much everything I did on the game after that was so crushingly boring it just would have been an exercise in prolonging the tedium, so these are the only two pages.
Below is the final list of sound effects:
The Computer Model (for Flour, Dough and Bread).
Quite a lot of work went into what one might call: "weights and measures" and "dough behaviour" etc.
I tried to get the following weights and measures as accurate as possible:
Simulator-tastic.
Using the correct weights and measures has the added bonus of authenticity and brings the game into the simulator catagory.
What I had to create was a computer model in the game, to model the mixing, rising, proving, knocking-back and baking of the dough.
The computer model I developed is far simpler than any scientist would use yet quite a bit more sophisticated than you'd find in your average game.
The most involved bit was the baking.
I modelled it as if I had two thermometers, and moisture sensors -- one in the centre of the dough and one on the surface,
then another thermometer for oven temperature, where as most proper scientific computer models would
have many more thermometers/sensors at various depths and positions within the dough and oven.
My computer model models how the temperature travels into the bread and how water migrates to, and then evaporates from, the surface (but simplified greatly into just two positions
dough middle and surface as mentioned above).
It models quite a few other things too like yeast activity, crust formation and browning (at different temperature bands).
I put quite a lot of research into the design of it: I had to gather a lot of facts like what temperature the yeast dies and how active it is at temperatures below that,
or what temperature yellowing, browning then burning would take place.
And it has to do all that dynamically: for example if the dough dries-out then the temperature goes-up much faster because there is no water evaporating from the
surface to keep it cooler. And if there is a reasonable amount of water left in the dough then it is pretty much limited to 100 degrees Celsius...
but exactly what constitutes a "reasonable amount" I had to estimate as with other facts not readily available and this is another way my game model differs from a scientific one in that
it hasn't been compared many times with what happens in the real world.... I just had to make semi-educated guesses about how much of an effect these things had, another example is
how much the formation of the crust reduces evaporation, the most important thing to get right is that the effect happens in the correct direction (and say doesn't increase something
when it should reduce something) and then make the best judgement I can. I compared what my model produced with loaves I found on the internet,
typically in the region of 1 pound loaves to 1Kg loaves and made sure it produced the correct results for them but not surprisingly there were no recipes for 3 stone loaves which is
what my game asks you to bake...there were some rough descriptions about how larger loaves should be baked at a low temperature and for a long time but there was
not much specific information out there so I had to extrapolate and make judgements and made it produce credible results for a 3 stone loaf while still producing the correct results
for the known normal 1 pound sized loaves.
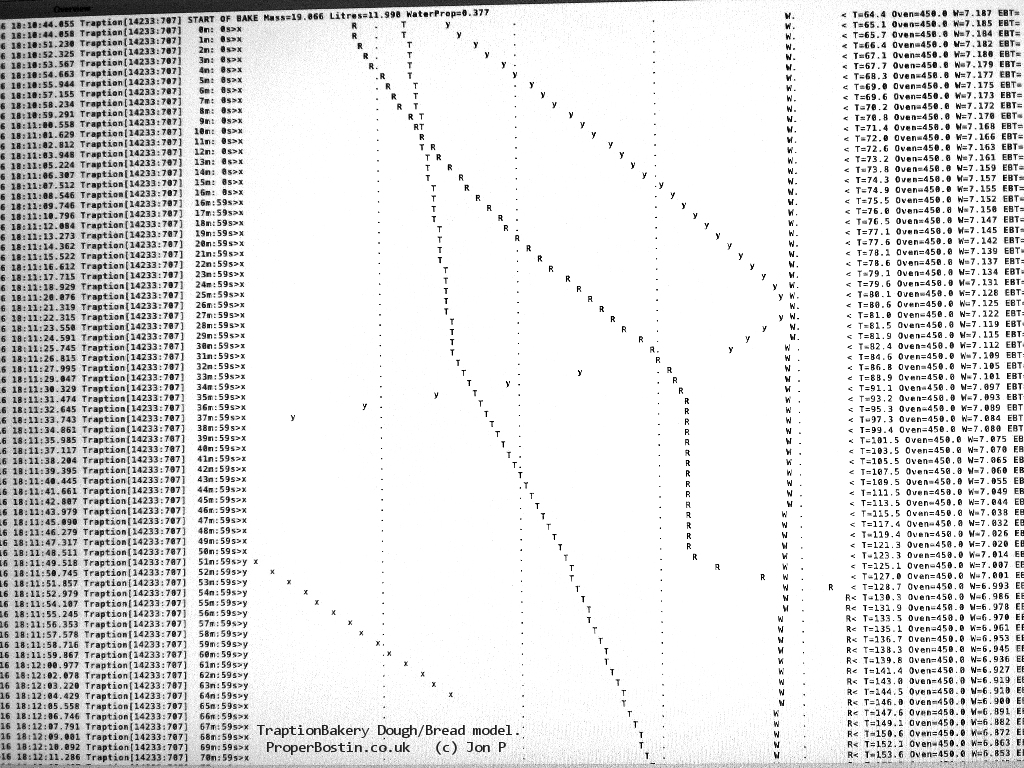
Below is a photo of my screen during development of the baking part of the model.
Of course not information you can get playing the game but extra info displayed on the development system so that I could check the model was working as expected.
It's a graph, a histogram, values increasing left to right (unlike the more typical histogram where the values increase from bottom to top).
The "y" trace is the yeast activity: you can see how it increases with the loaf temperature yet after a certain temperature it fades and dies.
The "R" trace shows how the bread rises. (You'll notice to begin with the bread rises with the yeast activity as the yeast makes gas bubbles in the bread, but as
the yeast dies the rise trace flattens-off until near the end where the increased heat starts to expand those bubbles -- I think this second phase of rising is called "oven spring").
The "W" trace shows the water content.
The "T" trace shows the core temperature.
(Later versions had a "c" trace to show crust coagulation, an "s" trace to show the crust shade/yellowing/browning and a "C" trace to show the crust temperature.)
All temperatures are in degrees F.
Below are the texts I digitized into the vector file, which the game then selects from depending on how your loaf turned-out to composite the letter the orphanage sends back to the bakery.
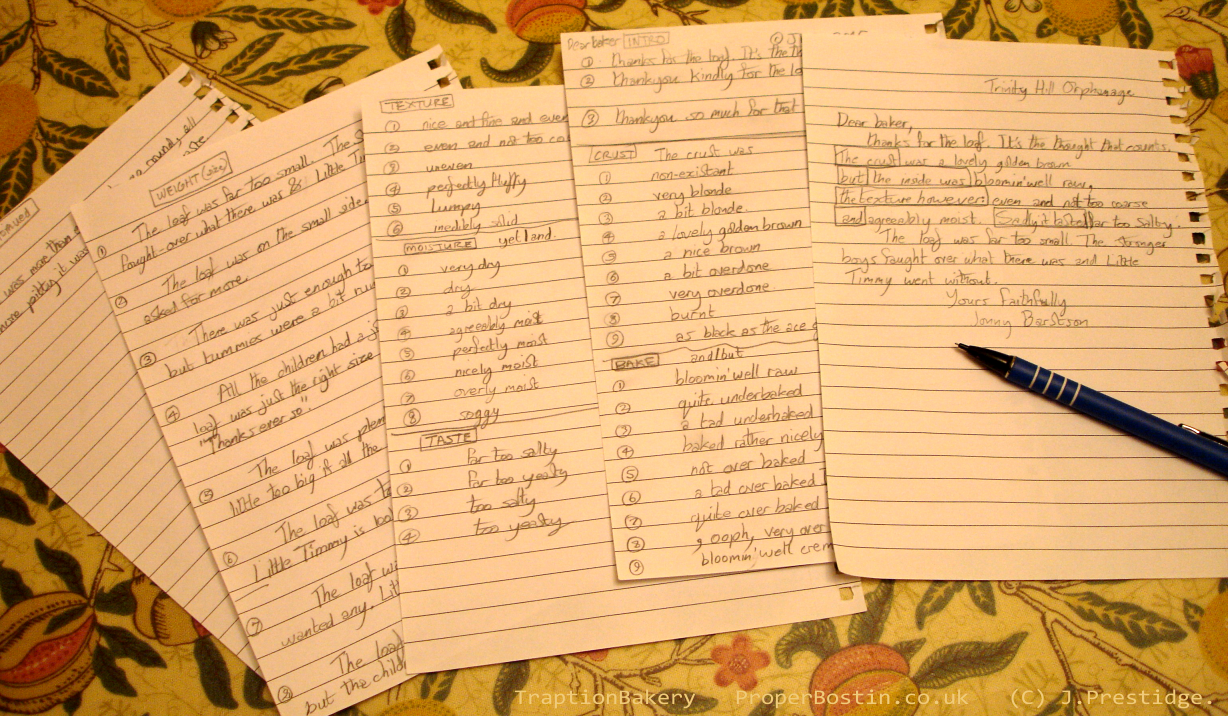
If you ever manage to fathom the machinery enough to bake a few loaves you will find that there're a vast number of outcomes of how your precious loaf can turn-out. For example: you could burn the crust and have it practically raw inside, or over bake the middle and not even have a brown crust (by having the oven temperature much too high or too low respectively), and you can burn it all as black as night all the way through if you really take you're eye off the timing. Perhaps the only real life eventuality you can't achieve is to bake it so much that it catches fire! Believe me, if I'd had time to put the flaming loaf feature in then I would have :-)
Although you can't quite go as far as baking the loaf so much it catches fire it is still a flexible model, for example
you can go completely the other way and not bake it at all.
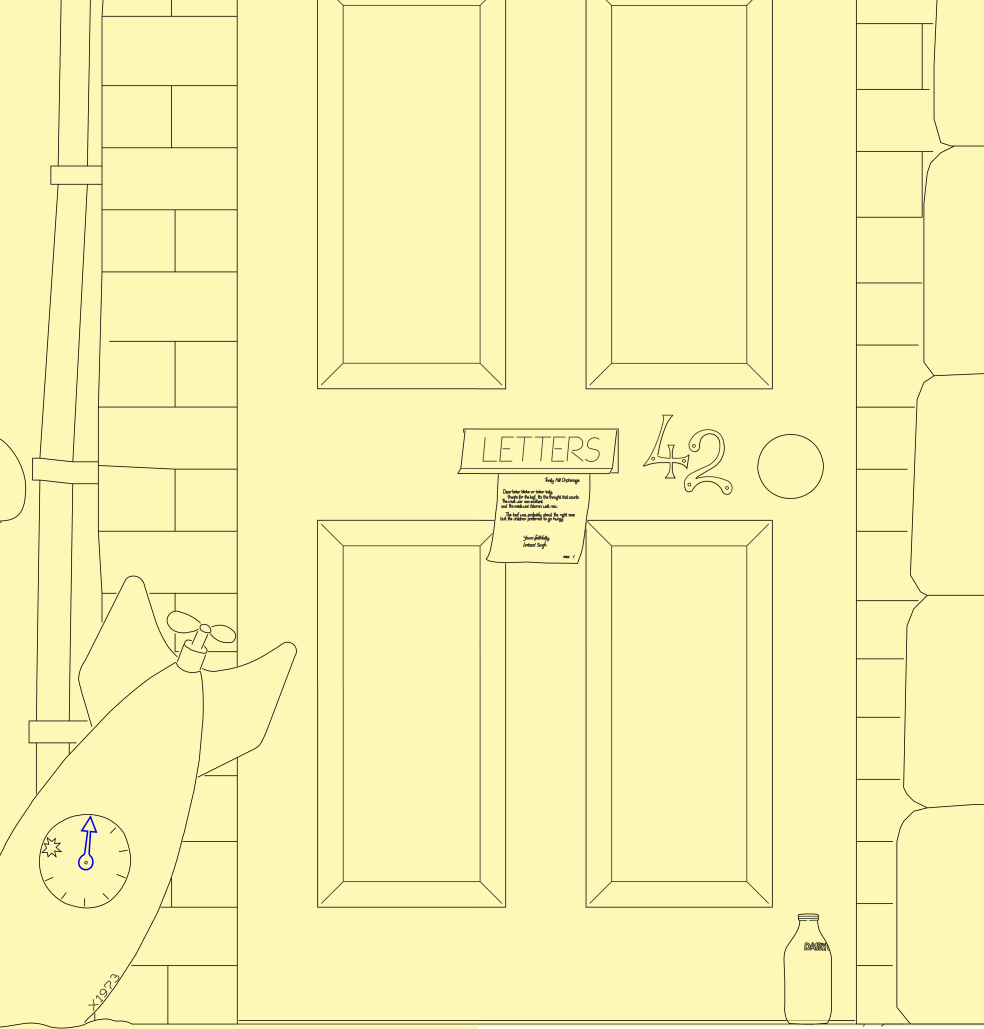
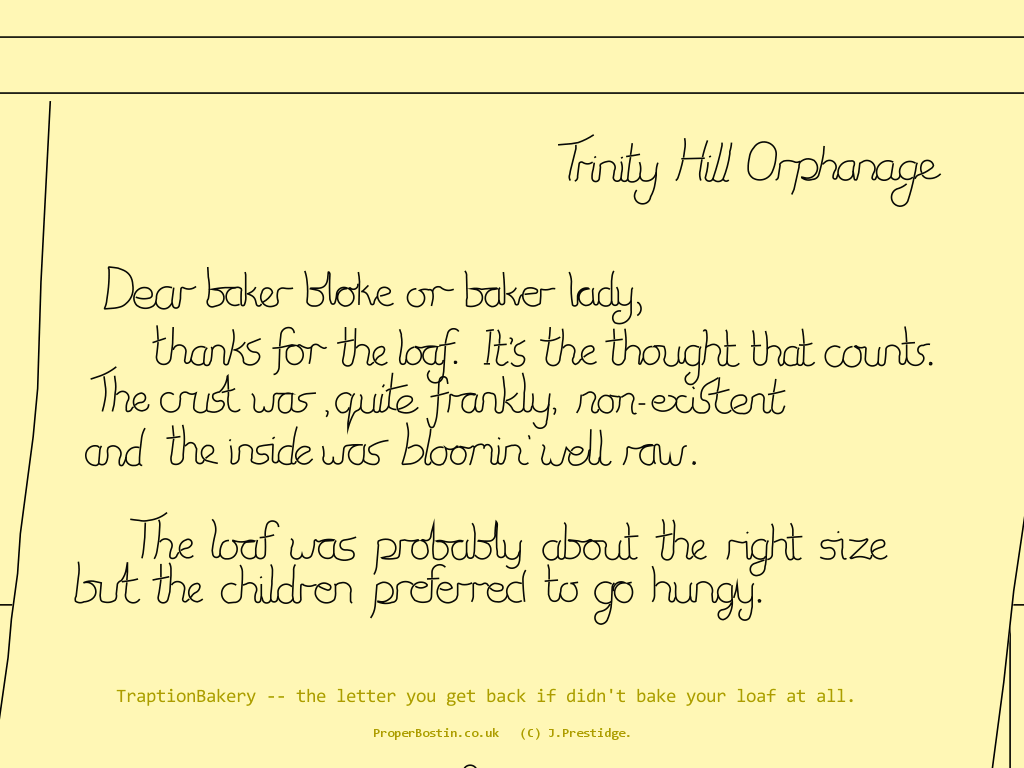
The below 2 pictures show the letter you would receive if you didn't do any baking at all in the oven and just sent out the raw ball of dough to the orphanage.
Facts about Mr Gromet:
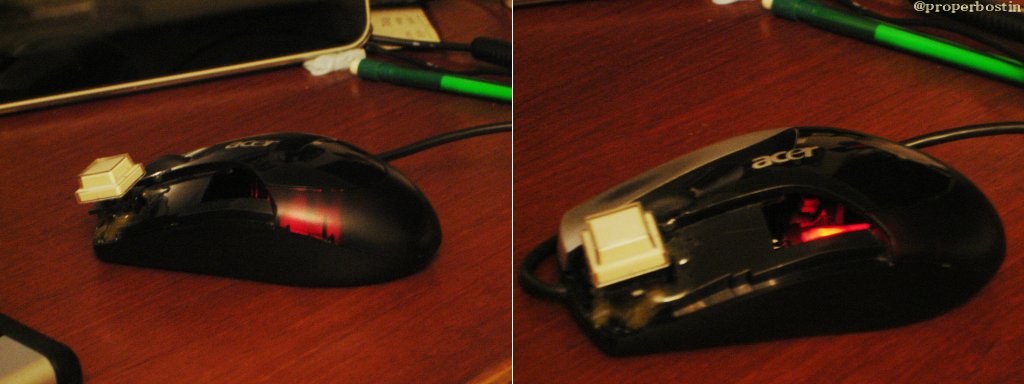
All the drawing that I did on my computer (a desk-top PC), I did with a mouse (rather than a tablet and stylus pen).
In fact the left mouse button went wrong some way through the project and I couldn't be bothered to go down to the shop to get another one so I soldered
and epoxy resin-ed a switch into it, Heath Robinson styli. See the below photo.
Perhaps there was some perverse reasoning in my subconscious that was trying to counteract the adage: "A bad workman blames his tools", that went something like:
"Well if you have really bad tools, and you're not a bad workman, you could do a really good job"...
flawed logic I know but your subconscious is quite a stupid animal: it makes you eat cake when you're already too fat to name but one of its acts of stupidity.
Oh yes, also I didn't use the mouse on a mouse mat on a desk, I do all my mouse driving on my right thy...sounds odd and looks odd but it is the best way (if you're right handed) because you don't have to hold your arm-up constantly, it is instead relaxed by your side, and the average pair of jeans is a better tracking surface for an optical mouse than a typical mouse mat... and more comfortable on that bit of you hand near your wrist that hangs off the back of the mouse.
The art package I used to draw with on computer was Paint Shop Pro 7, an old version I bought ages and ages ago and still use because
I'm too mean to buy a new version or go for the more
professional option and buy Photo Shop. PSP7 isn't too bad considering how old it is except for how it draws circles: and how it draws them is as follows: very crappily indeed,
at least when it is 256 colour mode anyway (which I always worked in for this project),
I dare say the crappy circle issue has been fixed long since in the current version of Pain Sho Pro,
but as for version 7 the circles it drew were so bad that all the circles you see in the game were mainly hand drawn by the time I had manually touched them-up.
Here are a few examples of PSP7 circles (scaled-up so you can see the pixels), one of 'em may as well have been a bloomin' octagon!

Every programmer will have a bug list for each project. Some may be automated things on-line, some may be in a note book like my one for TraptionBakery pictured below.
This shows just two of many pages.
Basically you write each bug down as soon as you see it happen and then it gets crossed-off when it is fixed and tested.
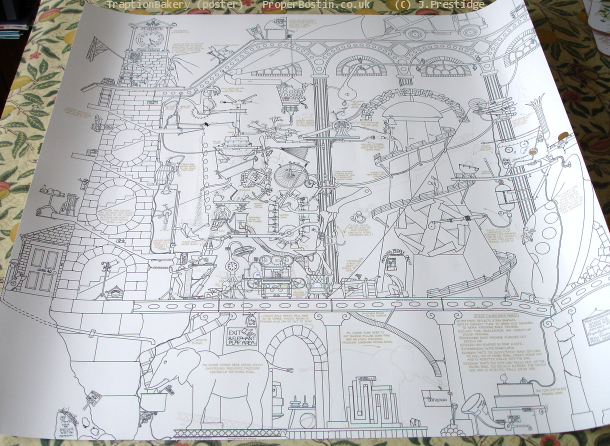
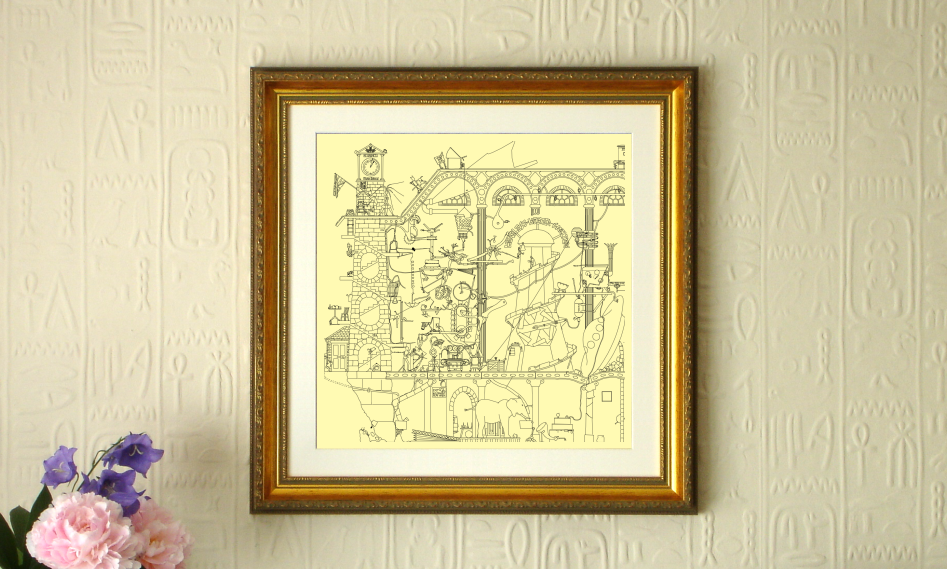
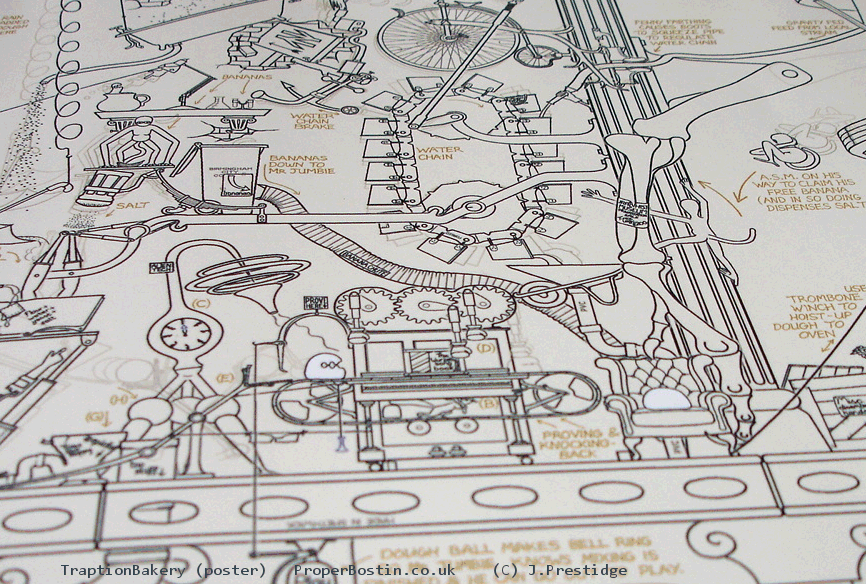
The poster was planned from the outset but it was the last major element of the project -- there was no point in doing it until the whole game was pretty much finished, otherwise I would have had to keep re-rendering parts and shifting them around as I made final changes in the game. The poster turned-out to be quite a lot more work than I expected, because to make any sense of it for a viewer that hadn't got the game it had to be annotated and the motion of various levers, arms, wheels, even space minkeys, had to be sort of 'animated' by showing their travel in feint lines. The annotations took quite a while to do, being all hand written... it wasn't something I expected but they give the poster a bit of a Rube Goldberg look as opposed to a Heath Robinson look. And because I had made the game so that you had to zoom-in loads to see some of the text and intricate bits of machinery, when you try and represent that in a single printed scene it's quite a challenge to make the finest detail visible.... the first thing I did was to go for the biggest poster commonly available: a 24 inch by 24 inch square, and to produce the artwork for it at 300dpi. But even then some text was still so small that I had to replace the writing on some signs with an appropriate symbol or simplify the sentence allowing me to make the text larger. Alas some text was so small that I had to omit it all together like the manufacturer's stamp on the union jack. Fortunately all the intricate bits of machinery were just about big enough to see on the poster.... the line thickness in the intricate areas had to be painstakingly shaved down by an appropriate amount so that the definition wasn't lost but larger things had to have thicker lines so as to be visible when viewing the poster when stood well back from it. The posters produced by Redbubble and Zazzle are quite expensive but they are print on demand so they don't go out of stock. I don't have much control over the price as I just get maybe 10 to 20 percent of the price.
![]()